Part 1: Choosing the right Hardware (Dedicated vs Cloud)
Hetzner has a variety of new dedicated root servers, cheaper second hand dedicated root server auctions as well as cloud servers, virtual servers or vservers to choose from.
Lets first look at the ressource requirements for Nextcloud. As the documentation states, both CPU and RAM requirements for servers are dependent on how many users you want to be able to use your new Nextcloud simultaniously. If your Nextcloud server is not being used, any two core machine with 4 GB RAM will easily do the trick.
For about 20 concurrent users, Blunix would recommend at least four CPU cores and between 16 GB and 24 GB of RAM. For up to 50 somewhat active users we would recommend at least 8 cores and 64 GB RAM and fast storage.
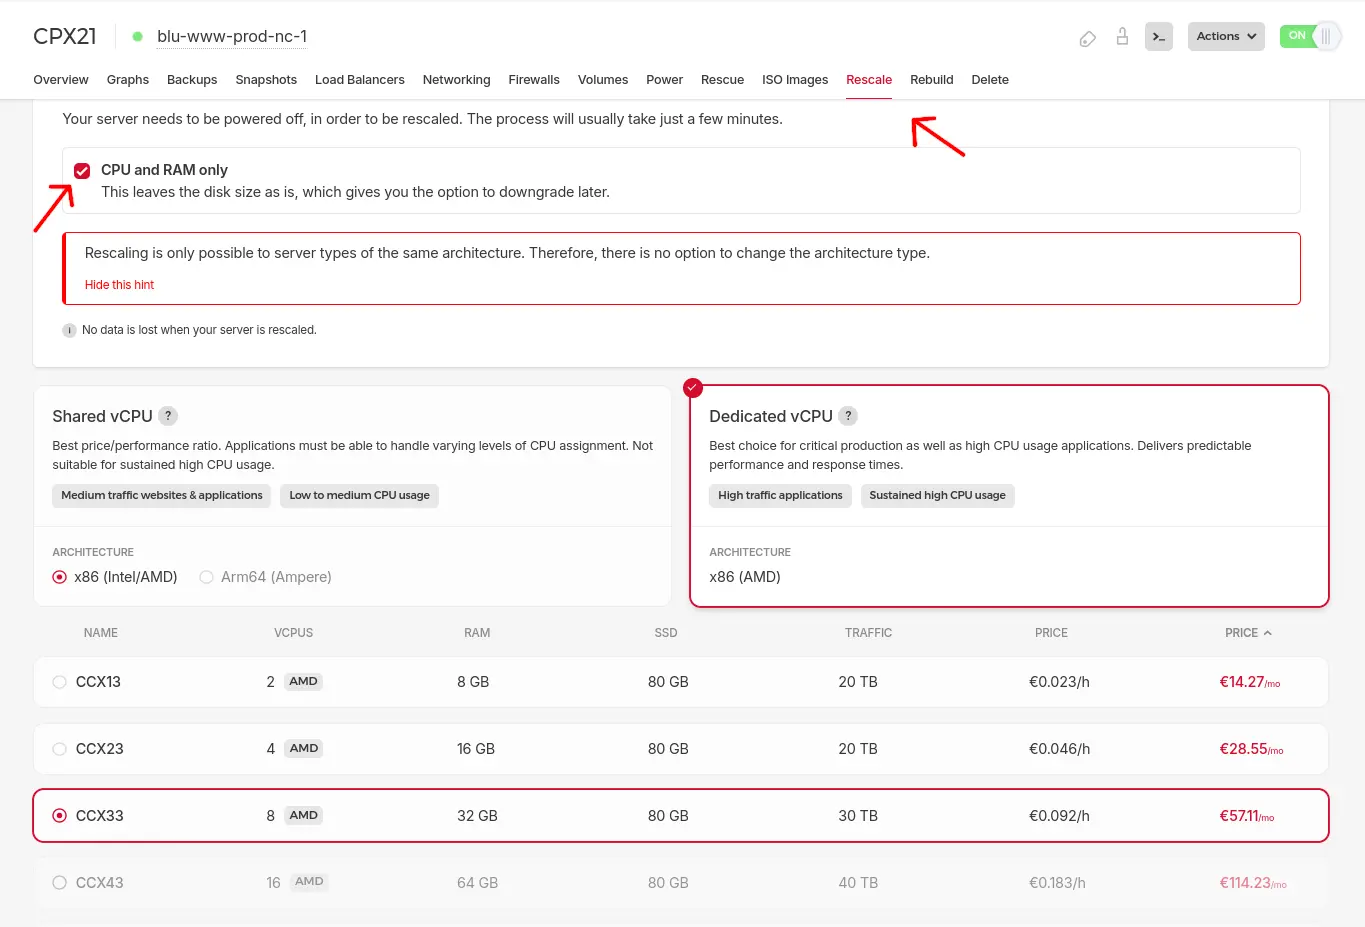
Remember that with Hetzner Cloud Servers you can always just scale up the chosen instance to see what fits your needs. If you are trying out different instance sizes, make sure not to enlarge the root disk so you can scale down again:
For writing this blogpost we chose a CCX23 cloud instance as well as a ~30.00 € per month dedicated server from the Hetzner server auctions. Both machines were located in Falkenstein, Germany, running Ubuntu Linux 22.04.
The cloud server we chose comes with four AMD CPU Cores, 16 GB RAM, a 160 GB root disk. Included are 20 TB of monthly traffic (keep this in mind if you plan to store multimedia files on your nextcloud). All of this costs 28.55 € per month.
We will use a Hetzner Storage Box or alternatively an additional HCloud Volume to store the nextcloud data directory (thats where Nextcloud saves the files you upload).
The second hand dedicated server comes with a 3.4 Ghz i7-6700, 32 GB RAM and two 512 GB SSDs for a total of 30.00 € per month. These servers usually come with very fast SSDs or very large Hard Disk Drives on board. You can also use a Hetzner Storage Box on a dedicated server (new or auctioned).
If you plan on renting a second hand dedicated root server from the auction you might be interested in Hetzners FAQ on the server auctions.
Installing Ubuntu on a Hetzner Cloud server
Creating a cloud server is intuitive and needs no further explaination - just select the image and create the server.
Installing Ubuntu on a dedicated or auctioned server
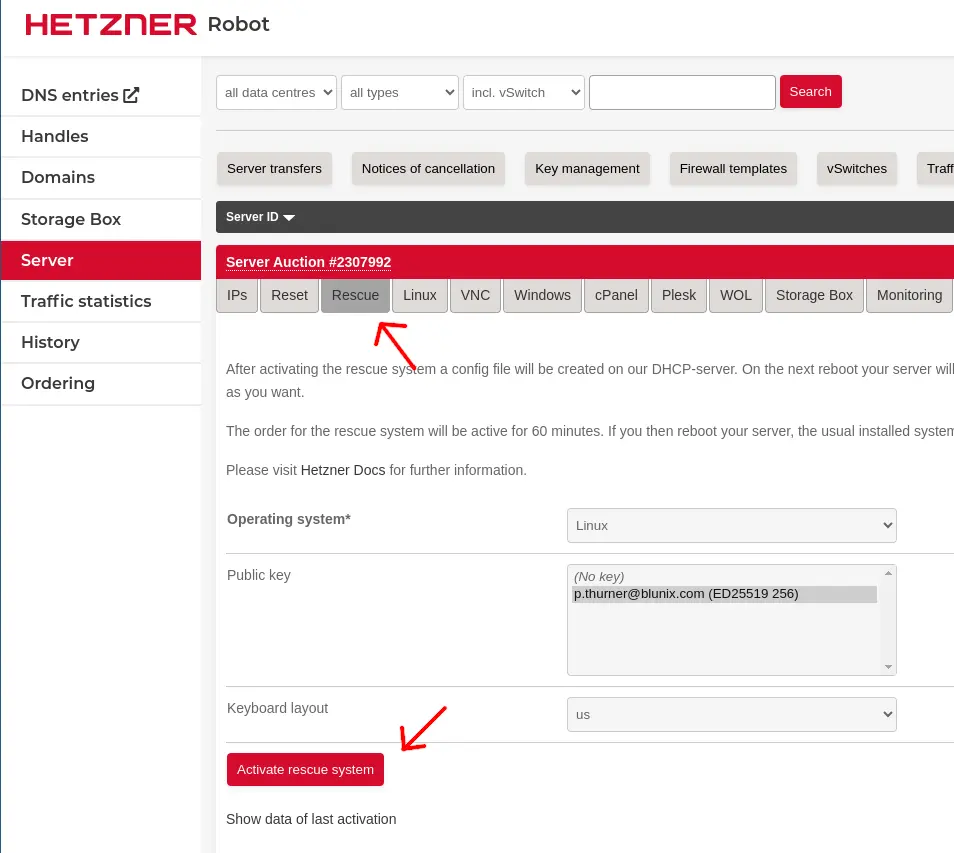
If you bought a dedicated root server or a used one from the server auctions, the initial installation is a bit more complex. At the first SSH login to your new servers IP address, the server is running the Hetzner Rescue Operating System, which is a Debian Linux based live system that allows you to access the disks of the server. Installing an operating system is done using the Hetzner provided script installimage.
First activate the rescue system:
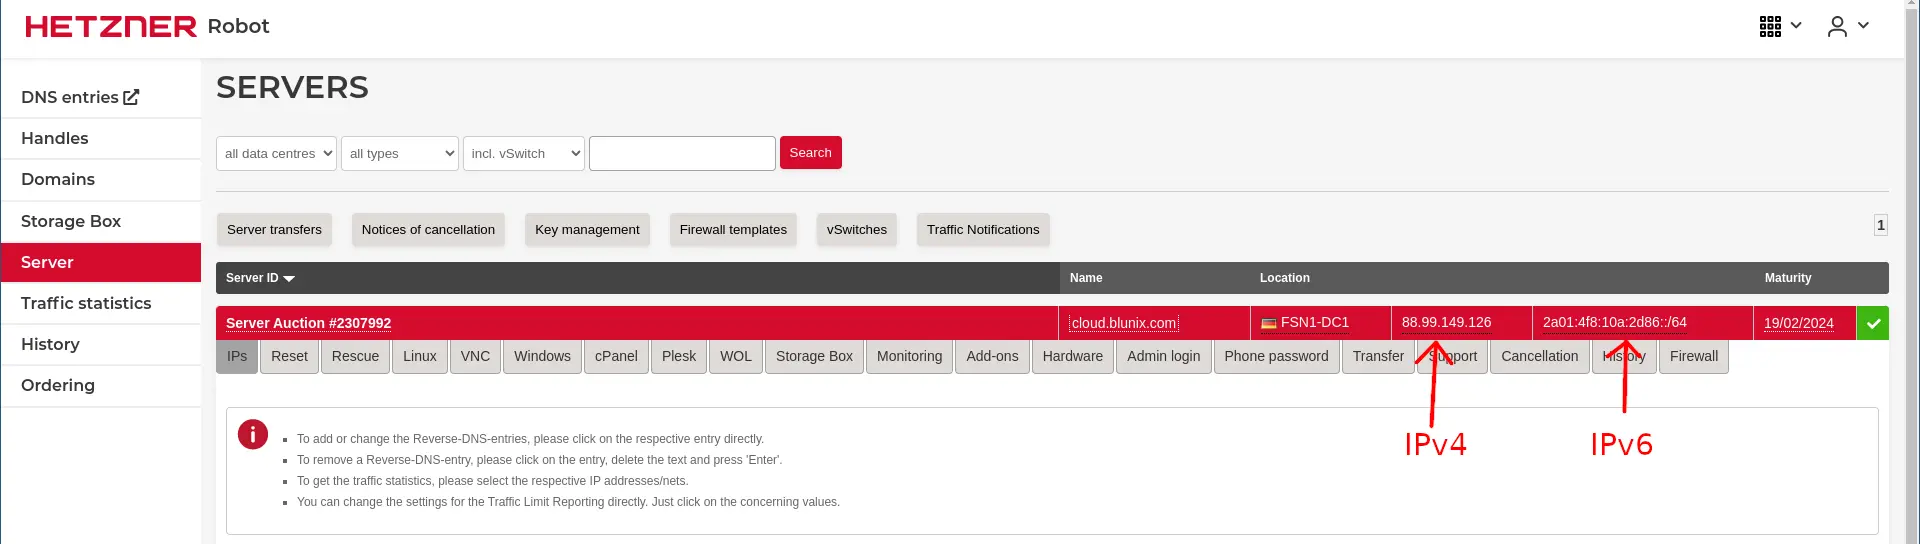
Then get the IP address of the server from the overview page:
Login to the new server with SSH:
ssh root@88.99.149.126
The authenticity of host '88.99.149.126 (88.99.149.126)' can't be established.
ED25519 key fingerprint is SHA256:g1zfOtabKtYxd7mMYgDrroka88xaMxynHfgFXAa1K4E.
This key is not known by any other names
Are you sure you want to continue connecting (yes/no/[fingerprint])? yes
Warning: Permanently added '88.99.149.126' (ED25519) to the list of known hosts.
Linux rescue 6.7.4 #1 SMP Tue Feb  6 15:07:47 UTC 2024 x86_64

-------------------------------------------------------------------------------------------------------------------------

  Welcome to the Hetzner Rescue System.

  This Rescue System is based on Debian GNU/Linux 12 (bookworm) with a custom kernel.
  You can install software like you would in a normal system.

  To install a new operating system from one of our prebuilt images, run 'installimage' and follow the instructions.

  Important note: Any data that was not written to the disks will be lost during a reboot.

  For additional information, check the following resources:
    Rescue System:           https://docs.hetzner.com/robot/dedicated-server/troubleshooting/hetzner-rescue-system
    Installimage:            https://docs.hetzner.com/robot/dedicated-server/operating-systems/installimage
    Install custom software: https://docs.hetzner.com/robot/dedicated-server/operating-systems/installing-custom-images
    other articles:          https://docs.hetzner.com/robot

-------------------------------------------------------------------------------------------------------------------------

Rescue System (via Legacy/CSM) up since 2024-02-20 23:52 +01:00

Hardware data:

   CPU1: Intel(R) Core(TM) i7-6700 CPU @ 3.40GHz (Cores 8)
   Memory:  31891 MB
   Disk /dev/sda: 512 GB (=> 476 GiB) doesn't contain a valid partition table
   Disk /dev/sdb: 512 GB (=> 476 GiB) doesn't contain a valid partition table
   Total capacity 953 GiB with 2 Disks

Network data:
   eth0  LINK: yes
         MAC:  90:1b:0e:8f:c3:34
         IP:   88.99.149.126
         IPv6: 2a01:4f8:10a:2d86::2/64
         Intel(R) PRO/1000 Network Driver

root@rescue ~ #
We will use the Hetzner provided script installimage to install Ubuntu 22.04. This script requires a config file. You can find additional config files in the rescue system under "/root/configs/".
cat << EOF > myconfig.txt
DRIVE1 /dev/sda
DRIVE2 /dev/sdb

SWRAID 1
SWRAIDLEVEL 1

BOOTLOADER grub

HOSTNAME cloud.blunix.com

PART /boot ext3 2G
PART lvm   vg0   all

LV vg0 root /    ext4  100G
LV vg0 swap swap swap   4G

IMAGE /root/images/Ubuntu-2204-jammy-amd64-base.tar.gz
EOF
Start the installation using the config file we created:
installimage -c myconfig.txt

Found AUTOSETUP file '/autosetup'
Running unattended installimage installation ...

DRIVE1 /dev/sda
DRIVE2 /dev/sdb
SWRAID 1
SWRAIDLEVEL 1
BOOTLOADER grub
HOSTNAME cloud.blunix.com
PART /boot ext3 2G
PART lvm   vg0   all
LV vg0 root /    ext4  100G
LV vg0 swap swap swap   4G
IMAGE /root/images/Ubuntu-2204-jammy-amd64-base.tar.gz


ALL DATA ON THE GIVEN DISKS WILL BE DESTROYED!

DO YOU REALLY WANT TO CONTINUE? [y|N] y


WARNING:
  Starting installation in 20 seconds ...
  Press X to continue immediately ...
  Installation will DELETE ALL DATA ON DISK(s)!
  Press CTRL-C to abort now!
  => ....................

                Hetzner Online GmbH - installimage

  Your server will be installed now, this will take some minutes
             You can abort at any time with CTRL+C ...

         :  Reading configuration                           done
         :  Loading image file variables                    done
         :  Loading debian specific functions               done
   1/17  :  Deleting partitions                             done
   2/17  :  Test partition size                             done
   3/17  :  Creating partitions and /etc/fstab              done
   4/17  :  Creating software RAID level 1                  done
   5/17  :  Creating LVM volumes                            done
   6/17  :  Formatting partitions
         :    formatting /dev/md/0 with ext3                done
         :    formatting /dev/vg0/root with ext4            done
         :    formatting /dev/vg0/swap with swap            done
   7/17  :  Mounting partitions                             done
   8/17  :  Sync time via ntp                               done
         :  Importing public key for image validation       done
   9/17  :  Validating image before starting extraction     done
  10/17  :  Extracting image (local)                        done
  11/17  :  Setting up network config                       done
  12/17  :  Executing additional commands
         :    Setting hostname                              done
         :    Generating new SSH keys                       done
         :    Generating mdadm config                       done
         :    Generating ramdisk                            done
         :    Generating ntp config                         done
  13/17  :  Setting up miscellaneous files                  done
  14/17  :  Configuring authentication
         :    Fetching SSH keys                             done
         :    Disabling root password                       done
         :    Disabling SSH root login with password        done
         :    Copying SSH keys                              done
  15/17  :  Installing bootloader grub                      done
  16/17  :  Running some debian specific functions          done
  17/17  :  Clearing log files                              done

                  INSTALLATION COMPLETE
   You can now reboot and log in to your new system with the
 same credentials that you used to log into the rescue system.
After the installation has completed you can reboot the server:
shutdown -r now
On the first login, your SSH client will complain about a changed SSH remote host identification for the given IP address. In this case, this is normal and to be expected because you accepted the SSH host key of the Hetzner rescue operating system before and now your new Ubuntu 22.04 installation has different SSH host key. You can fix this like so:
ssh root@88.99.149.126
@@@@@@@@@@@@@@@@@@@@@@@@@@@@@@@@@@@@@@@@@@@@@@@@@@@@@@@@@@@
@    WARNING: REMOTE HOST IDENTIFICATION HAS CHANGED!     @
@@@@@@@@@@@@@@@@@@@@@@@@@@@@@@@@@@@@@@@@@@@@@@@@@@@@@@@@@@@
IT IS POSSIBLE THAT SOMEONE IS DOING SOMETHING NASTY!
Someone could be eavesdropping on you right now (man-in-the-middle attack)!
It is also possible that a host key has just been changed.
The fingerprint for the ED25519 key sent by the remote host is
SHA256:GoKmmJd2P6TdZUSM+URBgHNkgP5r60tpHyKINRNzOgk.
Please contact your system administrator.
Add correct host key in /home/user/.ssh/known_hosts to get rid of this message.
Offending RSA key in /home/user/.ssh/known_hosts:1547
  remove with:
  ssh-keygen -f "/home/user/.ssh/known_hosts" -R "88.99.149.126"
Host key for 88.99.149.126 has changed and you have requested strict checking.
Host key verification failed.


ssh-keygen -f "/home/user/.ssh/known_hosts" -R "88.99.149.126"
# Host 88.99.149.126 found: line 1545
# Host 88.99.149.126 found: line 1546
# Host 88.99.149.126 found: line 1547
/home/user/.ssh/known_hosts updated.
Original contents retained as /home/user/.ssh/known_hosts.old


ssh root@88.99.149.126
The authenticity of host '88.99.149.126 (88.99.149.126)' can't be established.
ED25519 key fingerprint is SHA256:GoKmmJd2P6TdZUSM+URBgHNkgP5r60tpHyKINRNzOgk.
This key is not known by any other names
Are you sure you want to continue connecting (yes/no/[fingerprint])? yes
Warning: Permanently added '88.99.149.126' (ED25519) to the list of known hosts.
Linux cloud 6.1.0-13-amd64 #1 SMP PREEMPT_DYNAMIC Debian 6.1.55-1 (2023-09-29) x86_64

The programs included with the Debian GNU/Linux system are free software;
the exact distribution terms for each program are described in the
individual files in /usr/share/doc/*/copyright.

Debian GNU/Linux comes with ABSOLUTELY NO WARRANTY, to the extent
permitted by applicable law.
root@cloud.blunix.com ~ #
Part 2: Basic Ubuntu configuration and security
For our SLA Hosting customers we have a large collection of services and configurations that we apply to all new servers. These are documented in the Blunix Manual in the provisioning and baseline services sections.
For your new nextcloud installation we recommend to perform (at least) the following basic configurations and security enhancements.
Update, upgrade, automatic security upgrades and kernel upgrade reboots
Lets begin with upgrading the Debian installation to the latest state and then enabling automatic security upgrades:
apt update
apt -y upgrade
apt -y dist-upgrade
apt -y install unattended-upgrades
dpkg-reconfigure unattended-upgrades
Make sure to select "Yes" when asked to install security upgrades automatically:

After upgrading the system to the latest state it is recommended to reboot the server in order to use the latest installed kernel:
shutdown -r now
If you prefer to have a "once installed I never have to touch it again" kind of installation, we recommend you to enable automatic reboots on kernel upgrades as well. The following configuration block will scedule these to happen at 2am, provided the automatic security upgrades installed a new kernel version. Keep in mind that things can go wrong with unattended reboots, but with a Ubuntu stable LTS version running on a Hetzner Cloud or dedicated server we would deem that rather unlikely.
Here is how to enable automatic reboots on Kernel upgrades:
cat << EOF > /etc/apt/apt.conf.d/52unattended-upgrades-local
// Automatically reboot WITHOUT CONFIRMATION if
// the file /var/run/reboot-required is found after the upgrade
Unattended-Upgrade::Automatic-Reboot "true";

// Automatically reboot even if there are users currently logged in
// when Unattended-Upgrade::Automatic-Reboot is set to true
Unattended-Upgrade::Automatic-Reboot-WithUsers "true";

// If automatic reboot is enabled and needed, reboot at the specific
// time instead of immediately
// Default: "now"
Unattended-Upgrade::Automatic-Reboot-Time "02:00";
EOF
Unattended upgrades are triggered by systemd service "unattended-upgrades.service", so lets give that a restart after changing its configuration:
systemctl restart unattended-upgrades.service
systemctl status unattended-upgrades.service
● unattended-upgrades.service - Unattended Upgrades Shutdown
     Loaded: loaded (/lib/systemd/system/unattended-upgrades.service; enabled; vendor preset: enabled)
     Active: active (running) since Fri 2024-02-23 03:59:20 UTC; 5s ago
       Docs: man:unattended-upgrade(8)
   Main PID: 1275 (unattended-upgr)
      Tasks: 2 (limit: 38105)
     Memory: 8.2M
        CPU: 47ms
     CGroup: /system.slice/unattended-upgrades.service
             └─1275 /usr/bin/python3 /usr/share/unattended-upgrades/unattended-upgrade-shutdown --wait-for-signal

Feb 23 03:59:20 cloud systemd[1]: Started Unattended Upgrades Shutdown.
If you ever need to debug what happened during an unattended upgrade or reboot, here are the log file locations:
/var/log/unattended-upgrades/unattended-upgrades.log
/var/log/unattended-upgrades/unattended-upgrades-dpkg.log
Securing the SSH server
Ubuntu Linux comes reasonably secure by default. Hence, there are many things we can disable in SSH, only to cause confusion later on when someone might need it.
However some things are enabled in SSH which nobody will ever need on a nextcloud server and which could be used with malicious intent. Lets disable those:
cat << "EOF" > /etc/ssh/sshd_config.d/99-custom.conf
# Passwords are depricated in favor of SSH keypair authentication
PasswordAuthentication no
PermitEmptyPasswords no
PubkeyAuthentication yes

# Change default SSH port to get rid of 99% of automated attacks
Port 2222

# We only login as root anyways (for convinience) so we might as well ban everyone else
AllowUsers root
AllowGroups root

# Disconnect after 5 minutes of idle to reduce risk of hijacking terminals
ClientAliveInterval 300
ClientAliveCountMax 0

# There are no xservers (graphical systems) on a nextcloud server
X11Forwarding no
EOF
Check if the syntax is valid:
sshd -t; echo $?
0
And then restart the ssh daemon:
systemctl restart sshd.service
systemctl status sshd.service
● ssh.service - OpenBSD Secure Shell server
     Loaded: loaded (/lib/systemd/system/ssh.service; enabled; vendor preset: enabled)
     Active: active (running) since Fri 2024-02-23 04:01:43 UTC; 3s ago
       Docs: man:sshd(8)
             man:sshd_config(5)
    Process: 1290 ExecStartPre=/usr/sbin/sshd -t (code=exited, status=0/SUCCESS)
   Main PID: 1291 (sshd)
      Tasks: 1 (limit: 38105)
     Memory: 1.7M
        CPU: 18ms
     CGroup: /system.slice/ssh.service
             └─1291 "sshd: /usr/sbin/sshd -D [listener] 0 of 10-100 startups"

Feb 23 04:01:43 cloud systemd[1]: Starting OpenBSD Secure Shell server...
Feb 23 04:01:43 cloud sshd[1291]: Server listening on 0.0.0.0 port 2222.
Feb 23 04:01:43 cloud sshd[1291]: Server listening on :: port 2222.
Feb 23 04:01:43 cloud systemd[1]: Started OpenBSD Secure Shell server.
Log out of your current terminal session and try to login again. You will get a "connection refused", as we set the SSH server port to 2222. If you have already installed the shorewall firewall (described below) you will just get a timeout.
ssh root@5.75.149.214
ssh: connect to host 5.75.149.214 port 22: Connection refused
Pass the -p argument to your ssh client command to specify the new port and login:
ssh root@5.75.149.214 -p 2222
Welcome to Ubuntu 22.04.3 LTS (GNU/Linux 5.15.0-91-generic x86_64)
After rebooting a dedicated server you might get connection refused for about a minute. Dedicated servers boot a bit slower than cloud servers.
Configuring fail2ban
fail2ban is a log-parsing application that monitors system logs for symptoms of an automated attack on your server. When it detects to many failed login attempts, requests or other obviously malicious strings in application log files within a short period of time from the same IP address, it will ban that IP using iptables. Here is how to install fail2ban:
apt install fail2ban
We will use the webserver Nginx to host our nextcloud with PHP-FPM. fail2ban uses "jails" to define which services to monitor and how. Create a new jail custom configuration for the applications we would like to monitor inside the /etc/fail2ban/jail.d/ directory:
cat << EOF > /etc/fail2ban/jail.d/99-custom.conf
[nginx-http-auth]
enabled = true
filter = nginx-http-auth
port = http,https
logpath = /var/log/nginx/error.log
maxretry = 5
bantime = 3600

[nginx-botsearch]
enabled = true
port = http,https
filter = nginx-botsearch
logpath = /var/log/nginx/access.log
maxretry = 2
bantime = 3600

[nextcloud]
backend = auto
enabled = true
port = 80,443
protocol = tcp
filter = nextcloud
maxretry = 3
bantime = 86400
findtime = 43200
logpath = /var/www/nextcloud/nextcloud/data/nextcloud.log

[ssh]
enabled  = true
port     = 2222
EOF
Notice that at the bottom of the file we specified that SSH is listening on port 2222, so that if fail2ban bans an IP it will ban it for port 2222.
Fail2ban uses filters to define regexes, which it will run against the logfiles defined in the jail configuration above. Create a custom nextcloud filter script as shown in the nextcloud documentation:
cat << EOF > /etc/fail2ban/filter.d/nextcloud.conf
[Definition]
_groupsre = (?:(?:,?\s*"\w+":(?:"[^"]+"|\w+))*)
failregex = ^\{%(_groupsre)s,?\s*"remoteAddr":""%(_groupsre)s,?\s*"message":"Login failed:
            ^\{%(_groupsre)s,?\s*"remoteAddr":""%(_groupsre)s,?\s*"message":"Trusted domain error.
datepattern = ,?\s*"time"\s*:\s*"%%Y-%%m-%%d[T ]%%H:%%M:%%S(%%z)?"
EOF
When restarting fail2ban, it will complain that there is no nginx and no nextcloud logfile yet. That is ok, we can just enable the systemd service so it starts on boot and actually start fail2ban after installing Nginx and Nextcloud.
systemctl enable fail2ban.service
systemctl restart fail2ban.service
systemctl status fail2ban.service
× fail2ban.service - Fail2Ban Service
     Loaded: loaded (/lib/systemd/system/fail2ban.service; enabled; vendor preset: enabled)
     Active: failed (Result: exit-code) since Thu 2024-02-22 04:08:38 UTC; 1s ago
       Docs: man:fail2ban(1)
    Process: 1974 ExecStart=/usr/bin/fail2ban-server -xf start (code=exited, status=255/EXCEPTION)
   Main PID: 1974 (code=exited, status=255/EXCEPTION)
        CPU: 74ms

Feb 22 04:08:38 cloud systemd[1]: Started Fail2Ban Service.
Feb 22 04:08:38 cloud fail2ban-server[1974]: 2024-02-22 04:08:38,448 fail2ban                [1974]: ERROR   Failed during configuration: Have not found any log file for nextcloud jail
Feb 22 04:08:38 cloud fail2ban-server[1974]: 2024-02-22 04:08:38,448 fail2ban                [1974]: ERROR   Async configuration of server failed
Feb 22 04:08:38 cloud systemd[1]: fail2ban.service: Main process exited, code=exited, status=255/EXCEPTION
Feb 22 04:08:38 cloud systemd[1]: fail2ban.service: Failed with result 'exit-code'.
As fail2ban wont start until we installed Nginx and Nextcloud, lets turn it off for now:
systemctl stop fail2ban.service
Haveged for Random Number Generation (RNG) for TLS
The haveged (HArdware Volatile Entropy Gathering and Expansion Daemon) provides a source of entropy for Linux systems to fill the entropy pool, enhancing the system's ability to generate random numbers. Entropy is crucial for various cryptographic operations, such as generating secure SSL certificates, encrypting data, and creating secure SSH keys. In Linux systems, entropy is gathered from hardware interactions, such as mouse movements and keyboard inputs, which can be limited in headless or virtualized environments, leading to potential slowdowns when performing operations that require high-quality randomness.
Here is how to install and configure haveged for your new nextcloud server:
apt install haveged
Haveged has a write_wakeup_threshold (in bits). When this is filled, haveged will idle until the threshold is reached again. By default this is 1024, which in our experience is a bit low. Lets increase it to three times that much:
cat << EOF > /etc/default/haveged
# Configuration file for haveged

# Options to pass to haveged:
#DAEMON_ARGS="--write 3072"
EOF
After changes to its config file we have to restart the service:
systemctl restart haveged.service
systemctl status haveged.service
● haveged.service - Entropy Daemon based on the HAVEGE algorithm
     Loaded: loaded (/lib/systemd/system/haveged.service; enabled; vendor preset: enabled)
     Active: active (running) since Fri 2024-02-23 04:10:58 UTC; 2s ago
       Docs: man:haveged(8)
             http://www.issihosts.com/haveged/
   Main PID: 1798 (haveged)
      Tasks: 1 (limit: 38105)
     Memory: 3.5M
        CPU: 169ms
     CGroup: /system.slice/haveged.service
             └─1798 /usr/sbin/haveged --Foreground --verbose=1

Feb 23 04:10:58 cloud systemd[1]: Stopping Entropy Daemon based on the HAVEGE algorithm...
Feb 23 04:10:58 cloud systemd[1]: haveged.service: Deactivated successfully.
Feb 23 04:10:58 cloud systemd[1]: Stopped Entropy Daemon based on the HAVEGE algorithm.
Feb 23 04:10:58 cloud systemd[1]: Started Entropy Daemon based on the HAVEGE algorithm.
Feb 23 04:10:58 cloud haveged[1798]: haveged: command socket is listening at fd 3
Feb 23 04:10:58 cloud haveged[1798]: haveged starting up
Feb 23 04:10:59 cloud haveged[1798]: haveged: ver: 1.9.14; arch: x86; vend: GenuineIntel; build: (gcc 11.2.0 ITV); collect: 128K
Feb 23 04:10:59 cloud haveged[1798]: haveged: cpu: (L4 VC); data: 32K (L4 V); inst: 32K (L4 V); idx: 23/40; sz: 31288/55167
Feb 23 04:10:59 cloud haveged[1798]: haveged: tot tests(BA8): A:1/1 B:1/1 continuous tests(B):  last entropy estimate 7.9953
Feb 23 04:10:59 cloud haveged[1798]: haveged: fills: 0, generated: 0
Analyzing past performance problems with atop
One tool we can not recommend enough is atop. It is essentially a top-style monitor that saves all output you can see in a regular "top" monitor every $interval of seconds. This enables you to check which processes caused performance issues on server a few hours or days ago. This is the recommended bare minimum of monitoring if you dont have a sophisticated monitoring system like Prometheus (what Blunix clients use in production).
Atop is particularly useful if your colleagues and developers complain that owncloud was slow three hours ago and you want to analyze what processes were causing high load to approximate how much you have to scale up the cloud instance.
You can install atop like so:
apt install atop
The default log interval for atop is 5 minutes, which seems a bit high. We prefer to save the state every 30 seconds:
sed -i 's/^LOGINTERVAL.*/LOGINTERVAL=30/g' /etc/default/atop
systemctl restart atop.service
systemctl status atop.service
● atop.service - Atop advanced performance monitor
     Loaded: loaded (/lib/systemd/system/atop.service; enabled; vendor preset: enabled)
     Active: active (running) since Thu 2024-02-22 04:13:37 UTC; 2s ago
       Docs: man:atop(1)
    Process: 2505 ExecStartPre=/bin/sh -c test -n "$LOGINTERVAL" -a "$LOGINTERVAL" -eq "$LOGINTERVAL" (code=exited, status=0/SUCCESS)
    Process: 2506 ExecStartPre=/bin/sh -c test -n "$LOGGENERATIONS" -a "$LOGGENERATIONS" -eq "$LOGGENERATIONS" (code=exited, status=0/SUCCESS)
    Process: 2508 ExecStartPost=/usr/bin/find ${LOGPATH} -name atop_* -mtime +${LOGGENERATIONS} -exec rm -v {} ; (code=exited, status=0/SUCCESS)
   Main PID: 2507 (atop)
      Tasks: 1 (limit: 38105)
     Memory: 5.6M
        CPU: 73ms
     CGroup: /system.slice/atop.service
             └─2507 /usr/bin/atop -R -w /var/log/atop/atop_20240222 30

Feb 22 04:13:37 cloud systemd[1]: Starting Atop advanced performance monitor...
Feb 22 04:13:37 cloud systemd[1]: Started Atop advanced performance monitor.
atop is installed by default on all servers managed by Blunix. Helpful usage examples are documented in the Blunix Manual.
Firewall with Shorewall
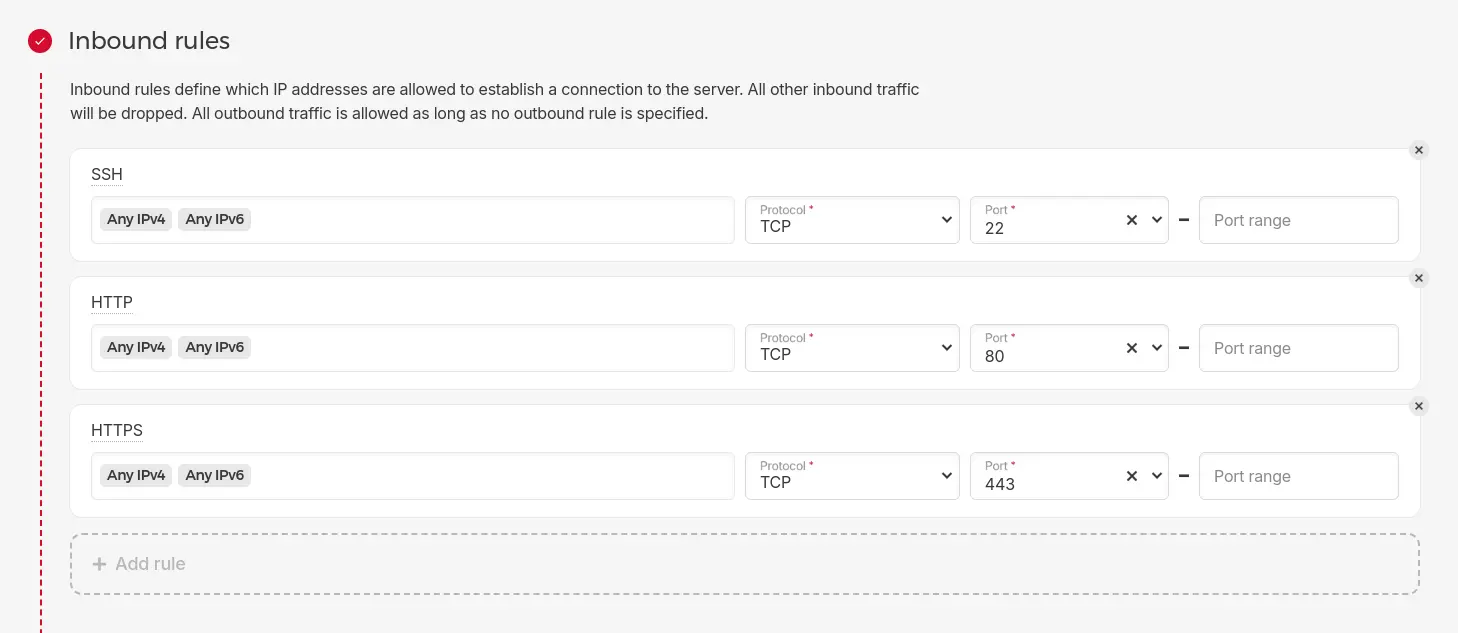
For inexperienced users we recommend to use the Hetzner Firewall for dedicated servers, or if you are running a hcloud server the Hetzner firewall for cloud servers. It is very simple and intuitive to configure. In its simplest configuration, you will want it to look like this (make sure to choose port 2222 for SSH if you followed the SSH Server hardening configuration above).
Hetzner offers to configure an outbound firewall. In a production environment hosted with Blunix outbound firewalls are configured to monitor and log all packets that are blocked by it, as one of many means of intrusion detection. If you work for a 10-50 people agency this kind of setup might be more than required and would overcomplicate tings unneccessarily.
We prepared a simplified version of Shorewall. As we do not know which monitoring, backup, central logfile and other systems you use, this configuration can not be complete in this blog post. You will have to adjust it to your needs. The examples shown below will give you a fully functional and reasonably secured Nextcloud.
Please read all configuration files carefully and adjust them to your needs. The apt package shorewall provides a firewall for IPv4 traffic with configuration in "/etc/shorewall/", while the apt package shorewall6 provides a firewall for IPv6 traffic with configuration in "/etc/shorewall6/".
apt install shorewall shorewall6
Be careful with dedicated servers here, their NICs are sometimes called "enp0s31f6" or similar instead of "eth0". Also refer to the Shorewall interfaces documentation.
cat << EOF > /etc/shorewall/interfaces
###############################################################################
?FORMAT 2
###############################################################################
#ZONE	INTERFACE	OPTIONS
pub   eth0   nosmurfs,routefilter=2,tcpflags,dhcp
EOF
cat << EOF > /etc/shorewall6/interfaces
###############################################################################
?FORMAT 2
###############################################################################
#ZONE   INTERFACE       OPTIONS
pub   eth0   nosmurfs,tcpflags,dhcp
EOF
We configure shorewall to simply drop all not explicitly allowed (as in defined in the rules files below) connection attempts from the public internet. Not specifically allowed connection attempts from the server to the public internet will be rejected and logged. Please refer to the Shorewall policy documentation for more information.
cat << EOF > /etc/shorewall/policy
#SOURCE		DEST		POLICY		LOG LEVEL	LIMIT:BURST
pub   all   DROP
all   all   REJECT   info
EOF
cat << EOF > /etc/shorewall6/policy
###############################################################################
#SOURCE         DEST            POLICY          LOG LEVEL       LIMIT:BURST
pub   all   DROP
all   all   REJECT   info
EOF
Please refer to the Shorewall zones documentation.
cat << EOF > /etc/shorewall/zones
#ZONE	TYPE	OPTIONS			IN			OUT
local   firewall
pub   ipv4
EOF
cat << EOF > /etc/shorewall6/zones
###############################################################################
#ZONE   TYPE    OPTIONS                 IN                      OUT
#                                       OPTIONS                 OPTIONS
local   firewall
pub   ipv6
EOF
Read and adjust this file particularly careful! Also refer to the Shorewall documentation about rules. You will want to narrow down DNS, NTP, SMTP and other services to the specific servers you configured on your server and allow communication with your backup, monitoring, central logfile and possibly other systems.
cat << EOF > /etc/shorewall/rules
#ACTION		SOURCE		DEST		PROTO	DEST	SOURCE		ORIGINAL	RATE		USER/	MARK	CONNLIMIT	TIME		HEADERS		SWITCH		HELPER
#							PORT	PORT(S)		DEST		LIMIT		GROUP
?SECTION NEW

# Allow incoming SSH on port 2222
ACCEPT pub local tcp 2222

# Allow incoming SSH on port 22
#SSH(ACCEPT) pub local - -

# Allow incoming SSH from specific IPs
#ACCEPT pub:3.3.3.3,4.4.4.4 local tcp 2222

# Allow incoming ICMP echo request/response
Ping(ACCEPT) pub local icmp -

# Allow outgoing ICMP echo request/response
Ping(ACCEPT) local pub icmp -

# Allow outgoing DNS queries
DNS(ACCEPT) local pub - -

# Allow outgoing NTP queries
NTP(ACCEPT) local pub - -

# Allow outgoing SMTP
ACCEPT local pub tcp 25,465,587

# Allow hkp (gpg public key servers)
HKP(ACCEPT) local pub - -

# Allow important ICMP (route-negotiation and time-exceeded)
AllowICMPs(ACCEPT) local all - -

# Allow outgoing git
Git(ACCEPT) local pub - -

# Allow outgoing HTTP and HTTPS
Web(ACCEPT) local pub - -

# allow outgoing SSHFS to hetzner storagebox on port 23
#ACCEPT local pub:u123456789.your-storagebox.de tcp 23

# Allow incoming HTTP and HTTPS for nextcloud
Web(ACCEPT) pub local - -
EOF
cat << EOF > /etc/shorewall6/rules
######################################################################################################################################################################################################
#ACTION         SOURCE          DEST            PROTO   DEST    SOURCE          ORIGINAL        RATE            USER/   MARK    CONNLIMIT       TIME            HEADERS         SWITCH          HELPER
#                                                       PORT    PORT(S)         DEST            LIMIT           GROUP
?SECTION NEW
# Allow outgoing HTTP and HTTPS
Web(ACCEPT) local pub - -

# Allow important ICMP (route-negotiation and time-exceeded)
AllowICMPs(ACCEPT) local all - -

# Allow outgoing NTP queries
NTP(ACCEPT) local pub - -
EOF
Use the "shorewall check" command to verify your new configuration before attempting to restart the firewall:
shorewall check
Checking using Shorewall 5.2.3.4...
Processing /etc/shorewall/params ...
Processing /etc/shorewall/shorewall.conf...
Loading Modules...
Checking /etc/shorewall/zones...
Checking /etc/shorewall/interfaces...
Determining Hosts in Zones...
Locating Action Files...
Checking /etc/shorewall/policy...
Adding Anti-smurf Rules
Adding rules for DHCP
Checking TCP Flags filtering...
Checking Kernel Route Filtering...
Checking Martian Logging...
Checking MAC Filtration -- Phase 1...
Checking /etc/shorewall/rules...
Checking /etc/shorewall/conntrack...
Checking MAC Filtration -- Phase 2...
Applying Policies...
Shorewall configuration verified
shorewall6 check
Checking using Shorewall 5.2.3.4...
Processing /etc/shorewall6/params ...
Processing /etc/shorewall6/shorewall6.conf...
Loading Modules...
Checking /etc/shorewall6/zones...
Checking /etc/shorewall6/interfaces...
Determining Hosts in Zones...
Locating Action Files...
Checking /etc/shorewall6/policy...
Adding Anti-smurf Rules
Adding rules for DHCP
Checking TCP Flags filtering...
Checking MAC Filtration -- Phase 1...
Checking /etc/shorewall6/rules...
Checking /usr/share/shorewall/action.AllowICMPs for chain AllowICMPs...
Checking /etc/shorewall6/conntrack...
Checking MAC Filtration -- Phase 2...
Applying Policies...
Checking /usr/share/shorewall/action.AllowICMPs for chain %AllowICMPs...
Checking /usr/share/shorewall/action.Broadcast for chain Broadcast...
Checking /usr/share/shorewall/action.Multicast for chain Multicast...
Shorewall6 configuration verified
If you are not 100% sure that the firewall you configured will not lock you out of the server, you can start the firewall in a tmux shell. This shell will not be closed and will continue to run commands even if your connection is interrupted.
apt install tmux
tmux
You can determine that you are inside the tmux shell when your shell displays a green status bar at the bottom of the terminal:

Execute the following commands inside the tmux. It will restart shorewall and shorewall6, and if you locked yourself out it will clear all firewall rules after 20 seconds.
If your shell still works after issuing these command enter simply press CRTL + C to abort the sleep command.
shorewall restart; shorewall6 restart; sleep 20; shorewall clear; shorewall6 clear
You can exit the tmux shell by typing "exit".
When you are sure everything is configured correctly, stop shorewall manually. We will use the systemd service to start shorewall again, which also starts it at boot time:
shorewall clear
shorewall6 clear
systemctl enable shorewall6.service
systemctl enable shorewall.service
Synchronizing state of shorewall.service with SysV service script with /lib/systemd/systemd-sysv-install.
Executing: /lib/systemd/systemd-sysv-install enable shorewall
Created symlink /etc/systemd/system/basic.target.wants/shorewall.service → /lib/systemd/system/shorewall.service.

systemctl start shorewall6.service
systemctl start shorewall.service

systemctl status shorewall6.service
systemctl status shorewall.service
● shorewall.service - Shorewall IPv4 firewall
     Loaded: loaded (/lib/systemd/system/shorewall.service; disabled; vendor preset: enabled)
     Active: active (exited) since Wed 2024-02-21 17:23:30 UTC; 4s ago
    Process: 1650 ExecStart=/sbin/shorewall $OPTIONS start $STARTOPTIONS (code=exited, status=0/SUCCESS)
   Main PID: 1650 (code=exited, status=0/SUCCESS)
        CPU: 148ms

Feb 21 17:23:29 blu-tool-prod-nc-1 systemd[1]: Starting Shorewall IPv4 firewall...
Feb 21 17:23:29 blu-tool-prod-nc-1 shorewall[1677]: Starting Shorewall....
Feb 21 17:23:29 blu-tool-prod-nc-1 shorewall[1677]: Initializing...
Feb 21 17:23:30 blu-tool-prod-nc-1 shorewall[1677]: Setting up Route Filtering...
Feb 21 17:23:30 blu-tool-prod-nc-1 shorewall[1677]: Setting up Martian Logging...
Feb 21 17:23:30 blu-tool-prod-nc-1 shorewall[1677]: Preparing iptables-restore input...
Feb 21 17:23:30 blu-tool-prod-nc-1 shorewall[1677]: Running /sbin/iptables-restore --wait 60...
Feb 21 17:23:30 blu-tool-prod-nc-1 shorewall[1677]: done.
Feb 21 17:23:30 blu-tool-prod-nc-1 systemd[1]: Finished Shorewall IPv4 firewall.
Failed connection attempts to the public internet will be refused and logged to "/var/log/syslog" now. You can use this to debug your firewall when you attach additional services like backups, monitoring, central logfiles and so on.
telnet www.blunix.com 8888
Trying 162.55.47.18...
telnet: Unable to connect to remote host: Connection refused

tail -n 1 /var/log/syslog
Feb 21 17:26:15 blu-tool-prod-nc-1 kernel: [  543.652005] local-pub REJECT IN= OUT=eth0 SRC=5.75.149.214 DST=162.55.47.18 LEN=60 TOS=0x10 PREC=0x00 TTL=64 ID=1896 DF PROTO=TCP SPT=43406 DPT=8888 WINDOW=64240 RES=0x00 SYN URGP=0
Part 3: Preparing the Webserver with Letsencrypt, Database, Redis Cache and PHP-FPM
Now that our server is reasonably secure its time to install all services that Nextcloud needs. We will need Nginx with Letsencrypt for TLS, MariaDB, Redis and PHP-FPM.
Generating Letsencrypt certificates
We need SSL certificates to offer encrypted HTTPS traffic with our webserver Nginx. Here is how to generate them. Note that we give certbot a fake email address (we are a bit privacy focused). If you give it a real email address, it will send you mail when your certificate is about to expire.
apt install certbot
certbot certonly --standalone --domain cloud.blunix.com
Saving debug log to /var/log/letsencrypt/letsencrypt.log
Enter email address (used for urgent renewal and security notices)
 (Enter 'c' to cancel): privacy-first@none-of-your-business.com

- - - - - - - - - - - - - - - - - - - - - - - - - - - - - - - - - - - - - - - -
Please read the Terms of Service at
https://letsencrypt.org/documents/LE-SA-v1.3-September-21-2022.pdf. You must
agree in order to register with the ACME server. Do you agree?
- - - - - - - - - - - - - - - - - - - - - - - - - - - - - - - - - - - - - - - -
(Y)es/(N)o: Y

- - - - - - - - - - - - - - - - - - - - - - - - - - - - - - - - - - - - - - - -
Would you be willing, once your first certificate is successfully issued, to
share your email address with the Electronic Frontier Foundation, a founding
partner of the Let's Encrypt project and the non-profit organization that
develops Certbot? We'd like to send you email about our work encrypting the web,
EFF news, campaigns, and ways to support digital freedom.
- - - - - - - - - - - - - - - - - - - - - - - - - - - - - - - - - - - - - - - -
(Y)es/(N)o: N
Account registered.
Requesting a certificate for cloud.blunix.com

Successfully received certificate.
Certificate is saved at: /etc/letsencrypt/live/cloud.blunix.com/fullchain.pem
Key is saved at:         /etc/letsencrypt/live/cloud.blunix.com/privkey.pem
This certificate expires on 2024-05-14.
These files will be updated when the certificate renews.

NEXT STEPS:
- The certificate will need to be renewed before it expires. Certbot can automatically renew the certificate in the background, but you may need to take steps to enable that functionality. See https://certbot.org/renewal-setup for instructions.

- - - - - - - - - - - - - - - - - - - - - - - - - - - - - - - - - - - - - - - -
If you like Certbot, please consider supporting our work by:
 * Donating to ISRG / Let's Encrypt:   https://letsencrypt.org/donate
 * Donating to EFF:                    https://eff.org/donate-le
- - - - - - - - - - - - - - - - - - - - - - - - - - - - - - - - - - - - - - - -
Installing and configuring Nginx
We chose Nginx to host nextcloud as its easy to configure as well as offering great performance.
Keep in mind that when hosting nextcloud for an agency with around 20-50 employees, nginx versus apache2 versus traeffic versus anything else is completely irrelevant. Webservers show their differences in performance in much, MUCH larger hosting scenarios only.
apt install nginx
Nginx comes with an exemplary default vhost, which can be deleted:
rm /etc/nginx/sites-enabled/default
Here is a Nginx vhost config for Nextcloud, optimized for performance and security. Replace cloud.blunix.com with your desired domain and save the file to "/etc/nginx/sites-available/nextcloud.conf".
editor /etc/nginx/sites-available/nextcloud.conf
server {
    listen 80;
    server_name _;
    return 301 https://cloud.blunix.com$request_uri;
    error_log /var/log/nginx/error.log;
    access_log /dev/null;
}

upstream php-handler {
    server unix:/var/run/php/nextcloud.sock;
}

server {
    listen 443      ssl http2;
    listen [::]:443 ssl http2;
    server_name cloud.blunix.com;

    # Use Mozilla's guidelines for SSL/TLS settings https://mozilla.github.io/server-side-tls/ssl-config-generator/
    ssl_certificate     /etc/letsencrypt/live/cloud.blunix.com/fullchain.pem;
    ssl_certificate_key /etc/letsencrypt/live/cloud.blunix.com/privkey.pem;
    add_header Strict-Transport-Security "max-age=15552000; includeSubDomains; preload;" always;
    client_max_body_size 512M;
    client_body_timeout 300s;
    fastcgi_buffers 64 4K;

    # Enable gzip but do not remove ETag headers
    gzip on;
    gzip_vary on;
    gzip_comp_level 4;
    gzip_min_length 256;
    gzip_proxied expired no-cache no-store private no_last_modified no_etag auth;
    gzip_types application/atom+xml application/javascript application/json application/ld+json application/manifest+json application/rss+xml application/vnd.geo+json application/vnd.ms-fontobject application/wasm application/x-font-ttf application/x-web-app-manifest+json application/xhtml+xml application/xml font/opentype image/bmp image/svg+xml image/x-icon text/cache-manifest text/css text/plain text/vcard text/vnd.rim.location.xloc text/vtt text/x-component text/x-cross-domain-policy;

    # Pagespeed is not supported by Nextcloud, so if your server is built
    # with the `ngx_pagespeed` module, uncomment this line to disable it
    #pagespeed off;

    # HTTP response headers borrowed from Nextcloud `.htaccess`
    add_header Referrer-Policy                      "no-referrer"   always;
    add_header X-Content-Type-Options               "nosniff"       always;
    add_header X-Download-Options                   "noopen"        always;
    add_header X-Frame-Options                      "SAMEORIGIN"    always;
    add_header X-Permitted-Cross-Domain-Policies    "none"          always;
    add_header X-Robots-Tag                         "noindex, nofollow" always;
    add_header X-XSS-Protection                     "1; mode=block" always;

    # Remove X-Powered-By, which is an information leak
    fastcgi_hide_header X-Powered-By;

    # Path to the root of your installation
    root /var/www/nextcloud/nextcloud;

    # Specify how to handle directories -- specifying `/index.php$request_uri`
    # here as the fallback means that Nginx always exhibits the desired behaviour
    # when a client requests a path that corresponds to a directory that exists
    # on the server. In particular, if that directory contains an index.php file,
    # that file is correctly served; if it doesn't, then the request is passed to
    # the front-end controller. This consistent behaviour means that we don't need
    # to specify custom rules for certain paths (e.g. images and other assets,
    # `/updater`, `/ocm-provider`, `/ocs-provider`), and thus
    # `try_files $uri $uri/ /index.php$request_uri`
    # always provides the desired behaviour.
    index index.php index.html /index.php$request_uri;

    # Rule borrowed from `.htaccess` to handle Microsoft DAV clients
    location = / {
        if ( $http_user_agent ~ ^DavClnt ) {
            return 302 /remote.php/webdav/$is_args$args;
        }
    }

    location = /robots.txt {
        allow all;
        log_not_found off;
        access_log off;
    }

    # Make a regex exception for `/.well-known` so that clients can still
    # access it despite the existence of the regex rule
    # `location ~ /(\.|autotest|...)` which would otherwise handle requests
    # for `/.well-known`.
    location ^~ /.well-known {
        # The rules in this block are an adaptation of the rules
        # in `.htaccess` that concern `/.well-known`.

        location = /.well-known/carddav { return 301 /remote.php/dav/; }
        location = /.well-known/caldav  { return 301 /remote.php/dav/; }

        location /.well-known/acme-challenge    { try_files $uri $uri/ =404; }
        location /.well-known/pki-validation    { try_files $uri $uri/ =404; }

        # Let Nextcloud's API for `/.well-known` URIs handle all other
        # requests by passing them to the front-end controller.
        return 301 /index.php$request_uri;
    }

    # Rules borrowed from `.htaccess` to hide certain paths from clients
    location ~ ^/(?:build|tests|config|lib|3rdparty|templates|data)(?:$|/)  { return 404; }
    location ~ ^/(?:\.|autotest|occ|issue|indie|db_|console)                { return 404; }

    # Ensure this block, which passes PHP files to the PHP process, is above the blocks
    # which handle static assets (as seen below). If this block is not declared first,
    # then Nginx will encounter an infinite rewriting loop when it prepends `/index.php`
    # to the URI, resulting in a HTTP 500 error response.
    location ~ \.php(?:$|/) {
        # Required for legacy support
        rewrite ^/(?!index|remote|public|cron|core\/ajax\/update|status|ocs\/v[12]|updater\/.+|oc[ms]-provider\/.+|.+\/richdocumentscode\/proxy) /index.php$request_uri;

        fastcgi_split_path_info ^(.+?\.php)(/.*)$;
        set $path_info $fastcgi_path_info;

        try_files $fastcgi_script_name =404;

        include fastcgi_params;
        fastcgi_param SCRIPT_FILENAME $document_root$fastcgi_script_name;
        fastcgi_param PATH_INFO $path_info;
        fastcgi_param HTTPS on;

        fastcgi_param modHeadersAvailable true;         # Avoid sending the security headers twice
        fastcgi_param front_controller_active true;     # Enable pretty urls
        fastcgi_pass php-handler;

        fastcgi_intercept_errors on;
        fastcgi_request_buffering off;

        fastcgi_read_timeout 300;
        fastcgi_max_temp_file_size 0;
    }

    location ~ \.(?:css|js|svg|gif|png|jpg|ico|wasm|tflite|map|ogg|flac|mjs)$ {
        try_files $uri /index.php$request_uri;
        expires 6M;         # Cache-Control policy borrowed from `.htaccess`
        access_log off;     # Optional: Don't log access to assets

        location ~ \.wasm$ {
            default_type application/wasm;
        }
    }

    location ~ \.woff2?$ {
        try_files $uri /index.php$request_uri;
        expires 7d;         # Cache-Control policy borrowed from `.htaccess`
        access_log off;     # Optional: Don't log access to assets
    }

    # Rule borrowed from `.htaccess`
    location /remote {
        return 301 /remote.php$request_uri;
    }

    location / {
        try_files $uri $uri/ /index.php$request_uri;
    }
}
Add mjs to mime.types to prevent the Nextcloud error "Could not check for JavaScript support. Please check manually if your webserver serves `.mjs` files using the JavaScript MIME type."
sed -i 's@application/javascript.*@application/javascript js mjs;@g' /etc/nginx/mime.types
Symlink the vhost to sites-enabled/ and check the nginx vhost syntax, then restart nginx:
ln -s /etc/nginx/sites-available/nextcloud.conf /etc/nginx/sites-enabled/
nginx -t
nginx: the configuration file /etc/nginx/nginx.conf syntax is ok
nginx: configuration file /etc/nginx/nginx.conf test is successful
systemctl restart nginx.service
systemctl status nginx.service
● nginx.service - A high performance web server and a reverse proxy server
     Loaded: loaded (/lib/systemd/system/nginx.service; enabled; vendor preset: enabled)
     Active: active (running) since Thu 2024-02-22 04:28:26 UTC; 5s ago
       Docs: man:nginx(8)
    Process: 4754 ExecStartPre=/usr/sbin/nginx -t -q -g daemon on; master_process on; (code=exited, status=0/SUCCESS)
    Process: 4755 ExecStart=/usr/sbin/nginx -g daemon on; master_process on; (code=exited, status=0/SUCCESS)
   Main PID: 4756 (nginx)
      Tasks: 9 (limit: 38105)
     Memory: 8.7M
        CPU: 35ms
     CGroup: /system.slice/nginx.service
             ├─4756 "nginx: master process /usr/sbin/nginx -g daemon on; master_process on;"
             ├─4757 "nginx: worker process" "" "" "" "" "" "" "" "" "" "" "" "" "" "" "" "" "" "" "" "" "" "" "" "" "" "" ""
             ├─4758 "nginx: worker process" "" "" "" "" "" "" "" "" "" "" "" "" "" "" "" "" "" "" "" "" "" "" "" "" "" "" ""
             ├─4759 "nginx: worker process" "" "" "" "" "" "" "" "" "" "" "" "" "" "" "" "" "" "" "" "" "" "" "" "" "" "" ""
             ├─4760 "nginx: worker process" "" "" "" "" "" "" "" "" "" "" "" "" "" "" "" "" "" "" "" "" "" "" "" "" "" "" ""
             ├─4761 "nginx: worker process" "" "" "" "" "" "" "" "" "" "" "" "" "" "" "" "" "" "" "" "" "" "" "" "" "" "" ""
             ├─4762 "nginx: worker process" "" "" "" "" "" "" "" "" "" "" "" "" "" "" "" "" "" "" "" "" "" "" "" "" "" "" ""
             ├─4763 "nginx: worker process" "" "" "" "" "" "" "" "" "" "" "" "" "" "" "" "" "" "" "" "" "" "" "" "" "" "" ""
             └─4764 "nginx: worker process" "" "" "" "" "" "" "" "" "" "" "" "" "" "" "" "" "" "" "" "" "" "" "" "" "" "" ""

Feb 22 04:28:26 cloud systemd[1]: Starting A high performance web server and a reverse proxy server...
Feb 22 04:28:26 cloud systemd[1]: Started A high performance web server and a reverse proxy server.
Now that nginx is fully configured we can configure a cronjob, or systemd timer, to run once every two month and generate a new Letsencrypt certificate and then restart nginx:
cat << "EOF" > /usr/local/sbin/renew-letsencrypt.sh
#!/bin/bash
#
# Renew letsencrypt certificate

/usr/bin/certbot certonly --force-renewal --webroot --webroot-path /var/www/nextcloud/nextcloud/ --domain cloud.blunix.com --cert-name cloud.blunix.com && /usr/bin/systemctl restart nginx.service
EOF
chmod 750 /usr/local/sbin/renew-letsencrypt.sh
cat << EOF > /etc/systemd/system/renew-letsencrypt.service
[Unit]
Description=Renew letsencrypt certificate for Nextlcoud

[Service]
Type=oneshot
ExecStart=/usr/local/sbin/renew-letsencrypt.sh
EOF
cat << EOF > /etc/systemd/system/renew-letsencrypt.timer
[Unit]
Description=Renews Letsencrypt certificate every two month

[Timer]
OnCalendar=*-1/2-1 4:0:0
Persistent=true

[Install]
WantedBy=timers.target
EOF
systemctl daemon-reload
systemctl enable renew-letsencrypt.timer
systemctl start renew-letsencrypt.timer
systemctl status renew-letsencrypt.timer

● renew-letsencrypt.timer - Runs my custom script every two months
     Loaded: loaded (/etc/systemd/system/renew-letsencrypt.timer; enabled; vendor preset: enabled)
     Active: active (waiting) since Wed 2024-02-21 23:38:58 UTC; 8s ago
    Trigger: Fri 2024-03-01 04:00:00 UTC; 1 week 1 day left
   Triggers: ● renew-letsencrypt.service

Feb 21 23:38:58 blu-tool-prod-nc-1 systemd[1]: Started Runs my custom script every two months.
Installing and configuring MariaDB
To install MariaDB use the following command. We will also install pwgen, a password generator that generates reasonably secure passwords, which we will need to generate passwords for the MySQL root user and the MySQL nextcloud user:
apt install mariadb-server pwgen
The mariadb-server apt package comes with a small script to enhance security right after the installation. This script will ask us to define a root password for MySQL, so lets generate one using "pwgen". The maximum character length for MySQL passwords is 32. After this you want to answer all questions of "mysql_secure_installation" with "Y":
pwgen -s 32 1
l6tkf6pbX9Df8JLXewcFsAEyRQ6SfIvZ
mysql_secure_installation

NOTE: RUNNING ALL PARTS OF THIS SCRIPT IS RECOMMENDED FOR ALL MariaDB
      SERVERS IN PRODUCTION USE!  PLEASE READ EACH STEP CAREFULLY!

In order to log into MariaDB to secure it, we'll need the current
password for the root user. If you've just installed MariaDB, and
haven't set the root password yet, you should just press enter here.

Enter current password for root (enter for none):
OK, successfully used password, moving on...

Setting the root password or using the unix_socket ensures that nobody
can log into the MariaDB root user without the proper authorisation.

You already have your root account protected, so you can safely answer 'n'.

Switch to unix_socket authentication [Y/n] Y
Enabled successfully!
Reloading privilege tables..
 ... Success!


You already have your root account protected, so you can safely answer 'n'.

Change the root password? [Y/n] Y
New password:
Re-enter new password:
Password updated successfully!
Reloading privilege tables..
 ... Success!


By default, a MariaDB installation has an anonymous user, allowing anyone
to log into MariaDB without having to have a user account created for
them.  This is intended only for testing, and to make the installation
go a bit smoother.  You should remove them before moving into a
production environment.

Remove anonymous users? [Y/n] Y
 ... Success!

Normally, root should only be allowed to connect from 'localhost'.  This
ensures that someone cannot guess at the root password from the network.

Disallow root login remotely? [Y/n] Y
 ... Success!

By default, MariaDB comes with a database named 'test' that anyone can
access.  This is also intended only for testing, and should be removed
before moving into a production environment.

Remove test database and access to it? [Y/n] Y
 - Dropping test database...
 ... Success!
 - Removing privileges on test database...
 ... Success!

Reloading the privilege tables will ensure that all changes made so far
will take effect immediately.

Reload privilege tables now? [Y/n] Y
 ... Success!

Cleaning up...

All done!  If you've completed all of the above steps, your MariaDB
installation should now be secure.

Thanks for using MariaDB!
It is advisable to save the root password in a "/root/.my.cnf" file so we do not have to enter it every time we login. As the Linux root user can easily reset the MySQL password, it is safe to save the password in plain text, as long as it is only accessible to the root user:
cat << EOF > /root/.my.cnf
[client]
user=root
password=l6tkf6pbX9Df8JLXewcFsAEyRQ6SfIvZ
EOF
chmod 600 /root/.my.cnf
The Nextcloud documentation describes what MariaDB settings to apply. Note that the documentation advises to save the settings to "/etc/mysql/my.cnf" - this is inadvisable though, because this file is managed by the apt package manager. This means that apt may want to overwrite this file with new defaults when a new version of mariadb-server is available for upgrading. If you make changes to the file, an automatic apt security upgrade will not setup the newer version of this config file.
Luckily MariaDB provides the option to define custom config files below "/etc/mysql/mariadb.conf.d/" to override the defaults set by the config files managed by the package manager:
cat << EOF > /etc/mysql/mariadb.conf.d/99-custom.cnf
[server]
skip_name_resolve = 1
innodb_buffer_pool_size = 128M
innodb_buffer_pool_instances = 1
innodb_flush_log_at_trx_commit = 2
innodb_log_buffer_size = 32M
innodb_max_dirty_pages_pct = 90
query_cache_type = 1
query_cache_limit = 2M
query_cache_min_res_unit = 2k
query_cache_size = 64M
tmp_table_size= 64M
max_heap_table_size= 64M
slow_query_log = 1
slow_query_log_file = /var/log/mysql/slow.log
long_query_time = 1

[mysqld]
character_set_server = utf8mb4
collation_server = utf8mb4_general_ci
transaction_isolation = READ-COMMITTED
binlog_format = ROW
innodb_large_prefix=on
innodb_file_format=barracuda
innodb_file_per_table=1
EOF
Restart MariaDB for the changes to take effect:
systemctl restart mariadb.service
systemctl status mariadb.service
● mariadb.service - MariaDB 10.6.16 database server
     Loaded: loaded (/lib/systemd/system/mariadb.service; enabled; vendor preset: enabled)
     Active: active (running) since Thu 2024-02-22 04:35:06 UTC; 2s ago
       Docs: man:mariadbd(8)
             https://mariadb.com/kb/en/library/systemd/
    Process: 5681 ExecStartPre=/usr/bin/install -m 755 -o mysql -g root -d /var/run/mysqld (code=exited, status=0/SUCCESS)
    Process: 5682 ExecStartPre=/bin/sh -c systemctl unset-environment _WSREP_START_POSITION (code=exited, status=0/SUCCESS)
    Process: 5684 ExecStartPre=/bin/sh -c [ ! -e /usr/bin/galera_recovery ] && VAR= ||   VAR=`cd /usr/bin/..; /usr/bin/galera_recovery`; [ $? -eq 0 ]   && systemctl set-environment _WSREP_START_POSITION=$VAR || exit 1 (code=exited, status>
    Process: 5792 ExecStartPost=/bin/sh -c systemctl unset-environment _WSREP_START_POSITION (code=exited, status=0/SUCCESS)
    Process: 5794 ExecStartPost=/etc/mysql/debian-start (code=exited, status=0/SUCCESS)
   Main PID: 5781 (mariadbd)
     Status: "Taking your SQL requests now..."
      Tasks: 12 (limit: 38105)
     Memory: 60.9M
        CPU: 348ms
     CGroup: /system.slice/mariadb.service
             └─5781 /usr/sbin/mariadbd

Feb 22 04:35:06 cloud mariadbd[5781]: 2024-02-22  4:35:06 0 [Note] Server socket created on IP: '127.0.0.1'.
Feb 22 04:35:06 cloud mariadbd[5781]: 2024-02-22  4:35:06 0 [Note] /usr/sbin/mariadbd: ready for connections.
Feb 22 04:35:06 cloud mariadbd[5781]: Version: '10.6.16-MariaDB-0ubuntu0.22.04.1-log'  socket: '/run/mysqld/mysqld.sock'  port: 3306  Ubuntu 22.04
Feb 22 04:35:06 cloud systemd[1]: Started MariaDB 10.6.16 database server.
Feb 22 04:35:06 cloud /etc/mysql/debian-start[5799]: Looking for 'mariadb' as: /usr/bin/mariadb
Feb 22 04:35:06 cloud /etc/mysql/debian-start[5799]: Looking for 'mariadb-check' as: /usr/bin/mariadb-check
Feb 22 04:35:06 cloud /etc/mysql/debian-start[5799]: This installation of MariaDB is already upgraded to 10.6.16-MariaDB.
Feb 22 04:35:06 cloud /etc/mysql/debian-start[5799]: There is no need to run mysql_upgrade again for 10.6.16-MariaDB.
Feb 22 04:35:06 cloud /etc/mysql/debian-start[5799]: You can use --force if you still want to run mysql_upgrade
Feb 22 04:35:06 cloud /etc/mysql/debian-start[5807]: Checking for insecure root accounts.
After configuring MariaDB we need to create a SQL database and user for the nextcloud service. You can use pwgen again to generate a resonably secure password. The maximum character length for MySQL passwords is 32:
pwgen -s 32 1
KuSJ1Ur64IFXXwEpVdEOaYbSKJrp72wN
mysql
Welcome to the MariaDB monitor.  Commands end with ; or \g.
Your MariaDB connection id is 31
Server version: 10.6.16-MariaDB-0ubuntu0.22.04.1 Ubuntu 22.04

Copyright (c) 2000, 2018, Oracle, MariaDB Corporation Ab and others.

Type 'help;' or '\h' for help. Type '\c' to clear the current input statement.

MariaDB [(none)]>
Use the following SQL statements to create a SQL database and user:
CREATE USER 'nextcloud'@'localhost' IDENTIFIED BY 'KuSJ1Ur64IFXXwEpVdEOaYbSKJrp72wN';
CREATE DATABASE IF NOT EXISTS nextcloud CHARACTER SET utf8mb4 COLLATE utf8mb4_general_ci;
GRANT ALL PRIVILEGES on nextcloud.* to 'nextcloud'@'localhost';
FLUSH PRIVILEGES;
exit
Installing Redis Server
For our purposes the Redis Server comes ready out of the box in Ubuntu and requires no further configuration.
apt install redis-server
Installing and configuring PHP-FPM
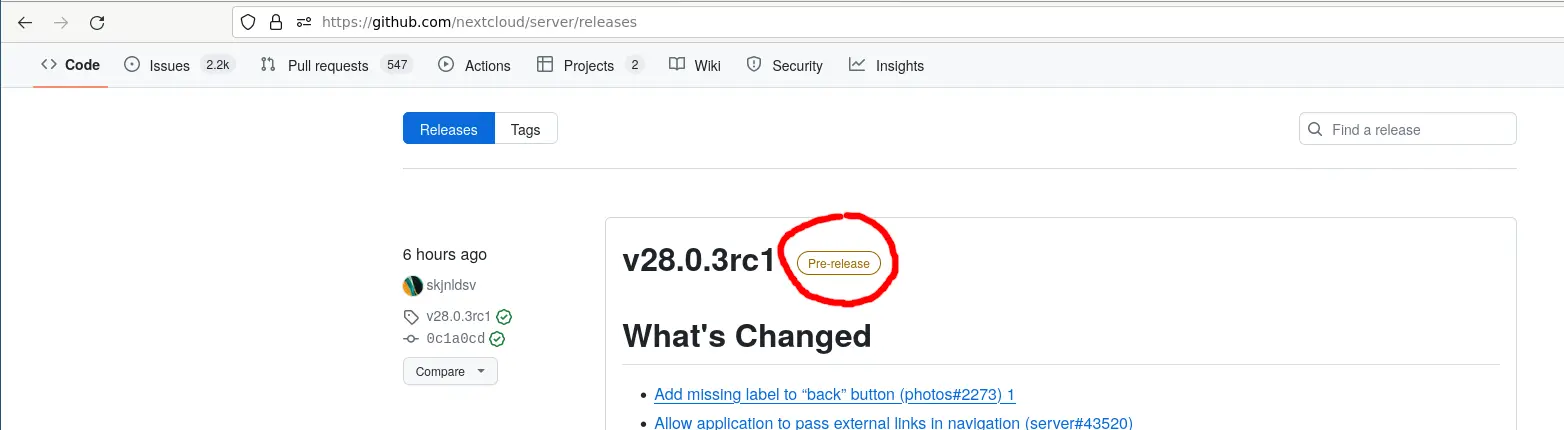
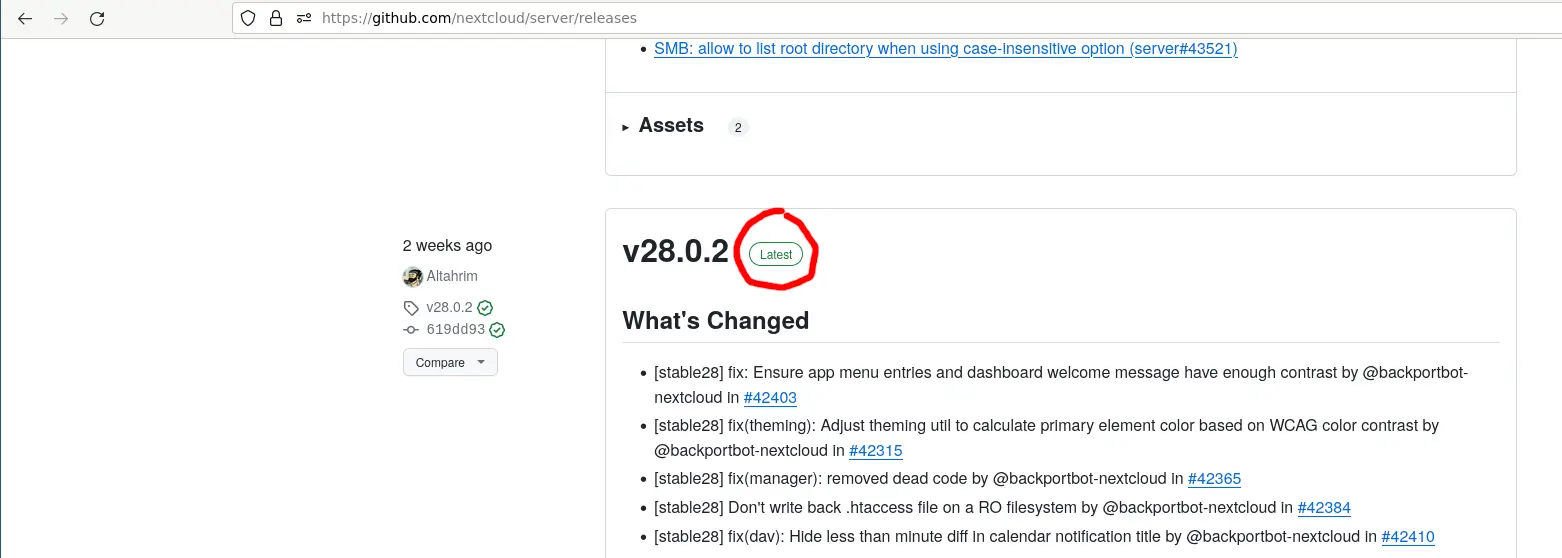
Refer to the Nextcloud system requirements page to determine which PHP Version is required to run the latest stable release of nextcloud. At the time of this writing, the latest stable release is v28.0.2. You can see the available releases at the Nextcloud server github releases page. Make sure to pick a tag labeled "Latest" in green and not "Pre-release" in brown color. This will commonly not be the first tag listed on this page so you have to scroll down a bit.
Do not choose this:
Scroll down a bit and choose the latest stable release:
Knowing the latest stable release version number, we can now select the correct page of the nextcloud documentation:
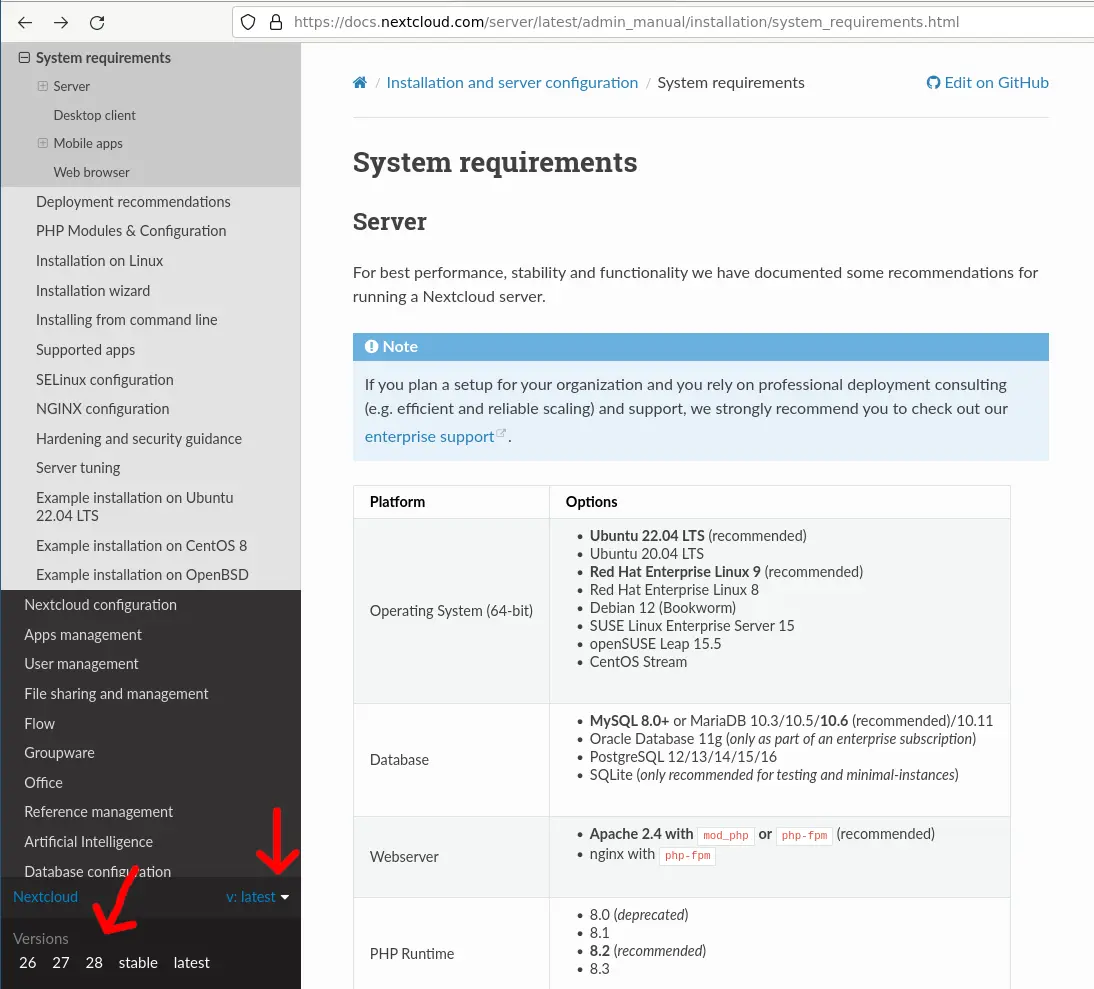
Viewing the correct version of the documentation, we can determine the PHP version recommended for this Nextcloud version - at the time of this writing this is PHP 8.2.
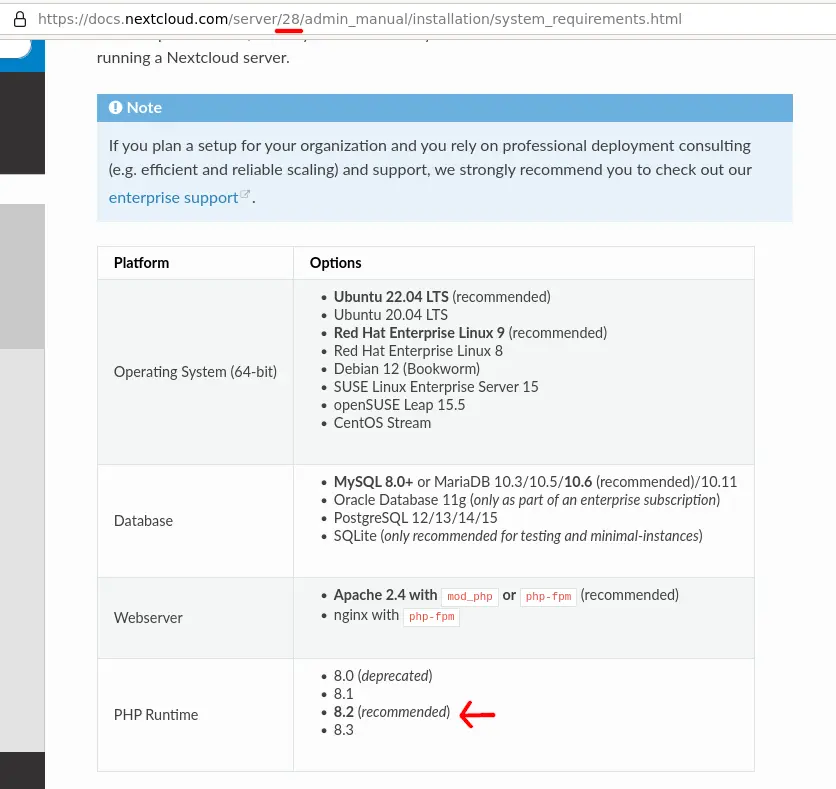
The PHP packages provided by Ubuntu are always for one specific PHP version - at the time of this writing Ubuntus default PHP version is 8.1 (we need 8.2).
apt-cache show php | grep ^Version
Version: 2:8.1+92ubuntu1
Blunix recommends not to use the Ubuntu provided packages but instead to setup the "Sury PPA" (Personal Package Archive). Sury is a Debian developer that provides an apt repository for installing specific PHP versions. On Ubuntu you can setup his ppa with the following command.
Note that Sury states that "if you are using nginx, you are advised to add ppa:ondrej/nginx-mainline or ppa:ondrej/nginx". As Sury does not provide a reason for this and as I (the author of this blog post) have hosted PHP pretty much since wham and have never experienced any need to use an Nginx package other than that provided by Ubuntu or Debian, I will stick to the Ubuntu provided nginx version.
add-apt-repository ppa:ondrej/php
PPA publishes dbgsym, you may need to include 'main/debug' component
Repository: 'deb https://ppa.launchpadcontent.net/ondrej/php/ubuntu/ jammy main'
Description:
Co-installable PHP versions: PHP 5.6, PHP 7.x, PHP 8.x and most requested extensions are included. Only Supported Versions of PHP (http://php.net/supported-versions.php) for Supported Ubuntu Releases (https://wiki.ubuntu.com/Releases) are provided. Don't ask for end-of-life PHP versions or Ubuntu release, they won't be provided.

Debian oldstable and stable packages are provided as well: https://deb.sury.org/#debian-dpa

You can get more information about the packages at https://deb.sury.org

IMPORTANT: The -backports is now required on older Ubuntu releases.

BUGS&FEATURES: This PPA now has a issue tracker:
https://deb.sury.org/#bug-reporting

CAVEATS:
1. If you are using php-gearman, you need to add ppa:ondrej/pkg-gearman
2. If you are using apache2, you are advised to add ppa:ondrej/apache2
3. If you are using nginx, you are advised to add ppa:ondrej/nginx-mainline
   or ppa:ondrej/nginx

PLEASE READ: If you like my work and want to give me a little motivation, please consider donating regularly: https://donate.sury.org/

WARNING: add-apt-repository is broken with non-UTF-8 locales, see
https://github.com/oerdnj/deb.sury.org/issues/56 for workaround:

# LC_ALL=C.UTF-8 add-apt-repository ppa:ondrej/php
More info: https://launchpad.net/~ondrej/+archive/ubuntu/php
Adding repository.
Press [ENTER] to continue or Ctrl-c to cancel.Adding deb entry to /etc/apt/sources.list.d/ondrej-ubuntu-php-jammy.list
Adding disabled deb-src entry to /etc/apt/sources.list.d/ondrej-ubuntu-php-jammy.list
Adding key to /etc/apt/trusted.gpg.d/ondrej-ubuntu-php.gpg with fingerprint 14AA40EC0831756756D7F66C4F4EA0AAE5267A6C
Hit:1 http://mirror.hetzner.com/ubuntu/packages jammy InRelease
Hit:2 http://mirror.hetzner.com/ubuntu/packages jammy-updates InRelease
Hit:3 http://mirror.hetzner.com/ubuntu/packages jammy-backports InRelease
Hit:4 http://mirror.hetzner.com/ubuntu/packages jammy-security InRelease
Hit:5 http://de.archive.ubuntu.com/ubuntu jammy InRelease
Hit:6 http://de.archive.ubuntu.com/ubuntu jammy-updates InRelease
Hit:7 http://de.archive.ubuntu.com/ubuntu jammy-backports InRelease
Get:8 https://ppa.launchpadcontent.net/ondrej/php/ubuntu jammy InRelease [23.9 kB]
Get:9 http://security.ubuntu.com/ubuntu jammy-security InRelease [110 kB]
Get:10 https://ppa.launchpadcontent.net/ondrej/php/ubuntu jammy/main amd64 Packages [122 kB]
Get:11 https://ppa.launchpadcontent.net/ondrej/php/ubuntu jammy/main Translation-en [37.5 kB]
Fetched 294 kB in 1s (387 kB/s)
Reading package lists... Done
After this we can install PHP packages in the desired version:
apt show php8.2-fpm
Package: php8.2-fpm
Version: 8.2.15-1+ubuntu22.04.1+deb.sury.org+1
[...]
The Nextcloud documentation has a list of apt packages it requires to be installed. To us this list seems incomplete and from our experience, the following apt command contains the complete list of packages.
Note the dashes at the end of the last three packages. Appending a dash to a package name during apt install ensures that the package is removed if it is currently installed!
We added these packages to be removed as this ensures that no other PHP-FPM versions are installed. For whatever reason Ubuntu installed those along PHP 8.2 at the time of this writing. Also note that the package php-mysqli can conflict with the MySQL PHP library we require, hence this package is to be uninstalled.
apt install libmagickcore-dev \
    php8.2-apcu \
    php8.2-bcmath \
    php8.2-bz2 \
    php8.2-cli \
    php8.2-common \
    php8.2-curl \
    php8.2-dev \
    php8.2-fpm \
    php8.2-gd \
    php8.2-gmp \
    php8.2-imagick \
    php8.2-intl \
    php8.2-mbstring \
    php8.2-mysql \
    php8.2-redis \
    php8.2-soap \
    php8.2-xml \
    php8.2-zip \
    php-fpm- \
    php8.1-fpm- \
    php8.3-fpm- \
    php-mysqli-
The next step is to define a PHP-FPM pool - this is a group of PHP-FPM worker processes responsible for a specific project, in our case Nextcloud. Run the following commands to create a PHP-FPM pool configuration:
cat << EOF > /etc/php/8.2/fpm/pool.d/nextcloud.conf
[nextcloud]

; User / group and directory related settings
user = nextcloud
group = nextcloud
chdir = /var/www/nextcloud/nextcloud
listen = /var/run/php/nextcloud.sock
listen.owner = nextcloud
listen.group = nextcloud
env[TMP] = /var/www/tmp
env[TMPDIR] = /var/www/tmp
env[TEMP] = /var/www/tmp

; php-fpm worker mode settings
pm = static
pm.max_children = 12
pm.start_servers = 2
pm.min_spare_servers = 1
pm.max_spare_servers = 3
pm.process_idle_timeout = 10s
pm.max_requests = 512

catch_workers_output = yes
access.log = /var/log/php-nextcloud.access.log
php_admin_flag[log_errors] = on
php_admin_value[error_log] = /var/log/php-nextcloud.error.log
slowlog = /var/log/php-nextcloud.slow.log
request_slowlog_timeout = 10

; additional settings
php_admin_value[default_socket_timeout] = 580
php_admin_value[expose_php] = Off
php_admin_value[upload_max_filesize] = 1024M
php_admin_value[memory_limit] = 1024M
php_admin_value[max_input_time] = 600
php_admin_value[max_execution_time] = 600
php_admin_value[max_file_uploads] = 20
php_admin_value[max_input_vars] = 1500
php_admin_value[post_max_size] = 1024M
php_admin_value[realpath_cache_size] = 512k
php_admin_value[realpath_cache_ttl] = 2
php_admin_value[opcache.use_cwd] = 1
php_admin_value[opcache.revalidate_path] = 1
php_admin_value[error_log] = syslog
php_admin_flag[display_errors] = False
php_admin_flag[expose_php] = False
php_admin_value[syslog.ident] = php-fpm-nextcloud
env[PATH] = /usr/local/bin:/usr/bin:/bin

php_value[session.save_handler] = redis
php_value[session.save_path] = "tcp://127.0.0.1:6379"
EOF
To prevent the Nextcloud error "The OPcache interned strings buffer is nearly full. To assure that repeating strings can be effectively cached, it is recommended to apply opcache.interned_strings_buffer to your PHP configuration with a value higher than `8’":
sed -i 's/;opcache.interned_strings_buffer.*/opcache.interned_strings_buffer=16/g' /etc/php/8.2/cli/php.ini
sed -i 's/;opcache.interned_strings_buffer.*/opcache.interned_strings_buffer=16/g' /etc/php/8.2/fpm/php.ini
When installing PHP-FPM, a default pool config file is always created below "/etc/php/8.2/fpm/pool.d/www.conf". This file can be removed:
rm /etc/php/8.2/fpm/pool.d/www.conf
At this point we can not start php8.2-fpm yet, as the tmp directory we configured (/var/www/tmp) is supposed to be a 512 MB RAM disk (or Linux tmpfs). We have not created and mounted this directory yet as it has to be owned by the Nextcloud Linux user and group, which we will create in the following steps. So for now, we can just keep php-fpm turned off and start it later when ready:
systemctl stop php8.2-fpm.service
Part 4: Installing and configuring Nextcloud
Now that we have everything installed that Nextcloud requires, lets install Nextcloud itself.
Creating the Linux user
Create a Linux system user and group called "nextcloud":
groupadd --system --gid 900 nextcloud
useradd --shell /bin/bash --home /var/www/nextcloud --create-home --uid 900 --gid nextcloud nextcloud
The www-data user, which runs the Nginx processes, needs to have access to files accessible to the nextcloud Linux group, such as "/var/www/nextcloud/nextcloud/":
usermod --append --groups nextcloud www-data
Restart Nginx for the Linux group permission changes to take effect:
systemctl restart nginx.service
Mounting a RAM disk for PHP tmp files
We configured PHP-FPM to write tmp files to "/var/www/tmp", which we will now configure to be a mounted RAM disk for extra speed (a so called Linux tmpfs):
mkdir -p /var/www/tmp
chown nextcloud:nextcloud /var/www/tmp
chmod 770 /var/www/tmp
Create a systemd mount for a 512 MB tmpfs:
cat << EOF > /etc/systemd/system/var-www-tmp.mount
[Unit]
Description=TMPFS for nextcloud systemd mount

[Install]
WantedBy=multi-user.target

[Mount]
What=tmpfs
Where=/var/www/tmp
Type=tmpfs
Options=defaults,noexec,nosuid,size=512M,uid=900,gid=900,mode=0770
EOF
Reload the systemd daemon and mount the directory:
systemctl daemon-reload
systemctl enable var-www-tmp.mount
Created symlink /etc/systemd/system/multi-user.target.wants/var-www-tmp.mount → /etc/systemd/system/var-www-tmp.mount.

systemctl restart var-www-tmp.mount
chown nextcloud:nextcloud /var/www/tmp
systemctl status var-www-tmp.mount
● var-www-tmp.mount - TMPFS for nextcloud systemd mount
     Loaded: loaded (/etc/systemd/system/var-www-tmp.mount; disabled; vendor preset: enabled)
     Active: active (mounted) since Wed 2024-02-21 03:27:35 UTC; 42ms ago
      Where: /var/www/tmp
       What: tmpfs
      Tasks: 0 (limit: 4524)
     Memory: 8.0K
        CPU: 3ms
     CGroup: /system.slice/var-www-tmp.mount

Feb 21 03:27:35 blu-tool-prod-nc-1 systemd[1]: Mounting TMPFS for nextcloud systemd mount...
Feb 21 03:27:35 blu-tool-prod-nc-1 systemd[1]: Mounted TMPFS for nextcloud systemd mount.
Downloading the Nextcloud archive
We will download a .tar.bz2 archive of the latest version of nextcloud from the official download page: scroll down to "Community Projects" -> "Archive" to obtain the download links.
The following commands have to be executed as the newly created nextcloud user:
su -l nextcloud
Download the latest version as .tar.bz archive:
wget -q https://download.nextcloud.com/server/releases/latest.tar.bz2
Download the sha256 checksum file and verify the archive:
wget -q https://download.nextcloud.com/server/releases/latest.tar.bz2.sha256
sha256sum -c latest.tar.bz2.sha256
latest.tar.bz2: OK
Download and import the nextcloud gpg - public key:
wget -q https://nextcloud.com/nextcloud.asc
gpg2 --import nextcloud.asc
gpg: key D75899B9A724937A: "Nextcloud Security " not changed
gpg: Total number processed: 1
gpg:              unchanged: 1

wget -q https://download.nextcloud.com/server/releases/latest.tar.bz2.asc
gpg2 --verify latest.tar.bz2.asc latest.tar.bz2
gpg: Signature made Thu 01 Feb 2024 09:46:27 AM UTC
gpg:                using RSA key 28806A878AE423A28372792ED75899B9A724937A
gpg: Good signature from "Nextcloud Security " [unknown]
gpg: WARNING: This key is not certified with a trusted signature!
gpg:          There is no indication that the signature belongs to the owner.
Primary key fingerprint: 2880 6A87 8AE4 23A2 8372  792E D758 99B9 A724 937A
Notice that gpg displays a waring message:
gpg: Good signature from "Nextcloud Security " [unknown]
gpg: WARNING: This key is not certified with a trusted signature!
gpg:          There is no indication that the signature belongs to the owner.
This refers to the gpg web of trust, which is largely abandoned and considered a failure and can hence safely be ignored. You can prevent this warning message by assigning "ultimate trust" to the gpg public key:
gpg2 --edit-key security@nextcloud.com
gpg (GnuPG) 2.2.27; Copyright (C) 2021 Free Software Foundation, Inc.
This is free software: you are free to change and redistribute it.
There is NO WARRANTY, to the extent permitted by law.


pub  rsa4096/D75899B9A724937A
     created: 2016-06-14  expires: never       usage: SC
     trust: unknown       validity: unknown
sub  rsa4096/36B8EF1826F57923
     created: 2016-06-14  expires: never       usage: E
[ unknown] (1). Nextcloud Security

gpg> trust
pub  rsa4096/D75899B9A724937A
     created: 2016-06-14  expires: never       usage: SC
     trust: unknown       validity: unknown
sub  rsa4096/36B8EF1826F57923
     created: 2016-06-14  expires: never       usage: E
[ unknown] (1). Nextcloud Security

Please decide how far you trust this user to correctly verify other users' keys
(by looking at passports, checking fingerprints from different sources, etc.)

  1 = I don't know or won't say
  2 = I do NOT trust
  3 = I trust marginally
  4 = I trust fully
  5 = I trust ultimately
  m = back to the main menu

Your decision? 5
Do you really want to set this key to ultimate trust? (y/N) y

pub  rsa4096/D75899B9A724937A
     created: 2016-06-14  expires: never       usage: SC
     trust: ultimate      validity: unknown
sub  rsa4096/36B8EF1826F57923
     created: 2016-06-14  expires: never       usage: E
[ unknown] (1). Nextcloud Security
Please note that the shown key validity is not necessarily correct
unless you restart the program.

gpg> quit
When you verify the file one more time the warning message is gone:
gpg2 --verify latest.tar.bz2.asc latest.tar.bz2
gpg: Signature made Thu 01 Feb 2024 09:46:27 AM UTC
gpg:                using RSA key 28806A878AE423A28372792ED75899B9A724937A
gpg: Good signature from "Nextcloud Security " [ultimate]
After all checks have passed its time to unpack the archive:
tar -xf latest.tar.bz2
This will extract the directory "nextcloud" to the absolute path "/var/www/nextcloud/nextcloud/", which is where we configured the document root for Nginx and PHP-FPM:
ls -l
total 182096
-rw-rw-r--  1 nextcloud nextcloud 186446961 Feb  1 09:46 latest.tar.bz2
-rw-rw-r--  1 nextcloud nextcloud       833 Feb  1 09:46 latest.tar.bz2.asc
-rw-rw-r--  1 nextcloud nextcloud        81 Feb 17 23:30 latest.tar.bz2.sha256
drwxr-xr-x 13 nextcloud nextcloud      4096 Feb  1 09:43 nextcloud
-rw-rw-r--  1 nextcloud nextcloud      3100 May  2  2022 nextcloud.asc
The following commands have to be executed as the root user again. Type "exit" to return back to the root user:
nextcloud@cloud:~$ exit
logout
root@cloud ~ #
Now that "/var/www/tmp" and "/var/www/nextcloud/nextcloud" exist, PHP-FPM can be started:
systemctl restart php8.2-fpm.service
systemctl status php8.2-fpm.service
● php8.2-fpm.service - The PHP 8.2 FastCGI Process Manager
     Loaded: loaded (/lib/systemd/system/php8.2-fpm.service; enabled; vendor preset: enabled)
     Active: active (running) since Thu 2024-02-22 04:43:49 UTC; 9min ago
       Docs: man:php-fpm8.2(8)
   Main PID: 21638 (php-fpm8.2)
     Status: "Processes active: 0, idle: 2, Requests: 0, slow: 0, Traffic: 0req/sec"
      Tasks: 3 (limit: 38105)
     Memory: 12.7M
        CPU: 119ms
     CGroup: /system.slice/php8.2-fpm.service
             ├─22146 "php-fpm: master process (/etc/php/8.2/fpm/php-fpm.conf)" "" "" "" "" "" "" "" "" "" "" "" "" "" "" "" "" "" "" "" "" "" ""
             ├─22147 "php-fpm: pool nextcloud" "" "" "" "" "" "" "" "" "" "" "" "" "" "" "" "" "" "" "" "" "" "" "" "" "" "" "" "" "" "" "" "" "" "" "" "" "" "" "" "" "" "" "" "" "" "" "" "" "" "" "" "" "" ""
             ├─22148 "php-fpm: pool nextcloud" "" "" "" "" "" "" "" "" "" "" "" "" "" "" "" "" "" "" "" "" "" "" "" "" "" "" "" "" "" "" "" "" "" "" "" "" "" "" "" "" "" "" "" "" "" "" "" "" "" "" "" "" "" ""
             ├─22149 "php-fpm: pool nextcloud" "" "" "" "" "" "" "" "" "" "" "" "" "" "" "" "" "" "" "" "" "" "" "" "" "" "" "" "" "" "" "" "" "" "" "" "" "" "" "" "" "" "" "" "" "" "" "" "" "" "" "" "" "" ""
             ├─22150 "php-fpm: pool nextcloud" "" "" "" "" "" "" "" "" "" "" "" "" "" "" "" "" "" "" "" "" "" "" "" "" "" "" "" "" "" "" "" "" "" "" "" "" "" "" "" "" "" "" "" "" "" "" "" "" "" "" "" "" "" ""
             ├─22151 "php-fpm: pool nextcloud" "" "" "" "" "" "" "" "" "" "" "" "" "" "" "" "" "" "" "" "" "" "" "" "" "" "" "" "" "" "" "" "" "" "" "" "" "" "" "" "" "" "" "" "" "" "" "" "" "" "" "" "" "" ""
             ├─22152 "php-fpm: pool nextcloud" "" "" "" "" "" "" "" "" "" "" "" "" "" "" "" "" "" "" "" "" "" "" "" "" "" "" "" "" "" "" "" "" "" "" "" "" "" "" "" "" "" "" "" "" "" "" "" "" "" "" "" "" "" ""
             ├─22153 "php-fpm: pool nextcloud" "" "" "" "" "" "" "" "" "" "" "" "" "" "" "" "" "" "" "" "" "" "" "" "" "" "" "" "" "" "" "" "" "" "" "" "" "" "" "" "" "" "" "" "" "" "" "" "" "" "" "" "" "" ""
             ├─22154 "php-fpm: pool nextcloud" "" "" "" "" "" "" "" "" "" "" "" "" "" "" "" "" "" "" "" "" "" "" "" "" "" "" "" "" "" "" "" "" "" "" "" "" "" "" "" "" "" "" "" "" "" "" "" "" "" "" "" "" "" ""
             ├─22155 "php-fpm: pool nextcloud" "" "" "" "" "" "" "" "" "" "" "" "" "" "" "" "" "" "" "" "" "" "" "" "" "" "" "" "" "" "" "" "" "" "" "" "" "" "" "" "" "" "" "" "" "" "" "" "" "" "" "" "" "" ""
             ├─22156 "php-fpm: pool nextcloud" "" "" "" "" "" "" "" "" "" "" "" "" "" "" "" "" "" "" "" "" "" "" "" "" "" "" "" "" "" "" "" "" "" "" "" "" "" "" "" "" "" "" "" "" "" "" "" "" "" "" "" "" "" ""
             ├─22157 "php-fpm: pool nextcloud" "" "" "" "" "" "" "" "" "" "" "" "" "" "" "" "" "" "" "" "" "" "" "" "" "" "" "" "" "" "" "" "" "" "" "" "" "" "" "" "" "" "" "" "" "" "" "" "" "" "" "" "" "" ""
             └─22158 "php-fpm: pool nextcloud" "" "" "" "" "" "" "" "" "" "" "" "" "" "" "" "" "" "" "" "" "" "" "" "" "" "" "" "" "" "" "" "" "" "" "" "" "" "" "" "" "" "" "" "" "" "" "" "" "" "" "" "" "" ""

Feb 22 04:43:49 cloud systemd[1]: Starting The PHP 8.2 FastCGI Process Manager...
Feb 22 04:43:49 cloud systemd[1]: Started The PHP 8.2 FastCGI Process Manager.
In the next chapter we will mount an external disk for additional storage of the Nextcloud data directory (where the users files will be uploaded to). You can skip this step if your Hetnzer Cloud server comes with enough root disk for your purposes by default.
Keep in mind that if you do not mount an additional disk you migh accidentally reach 100% disk capacity on the root disk of the server, which will lead to an unstable system. It is hence highly recommended to mount a different partition to the "/var/www/nextcloud/nextcloud/data/" directory.
Before starting nextcloud for the first time, the directory "/var/www/nextcloud/nextcloud/data", where user data will be stored, has to be manually created. Normally the installer creates it, but as we want to mount the directory before Nextcloud writes data to it, we have to do this before accessing Nextcloud for the first time.
mkdir /var/www/nextcloud/nextcloud/data
chown -R nextcloud:nextcloud /var/www/nextcloud
Note that the Nextcloud Security Hardening Guide recommends to place the Nextcloud data directory outside of the directory "/var/www/". After googling around a bit I have not found a good reason why that should be done. The documentation does not state a specific reason. I assume this is because if you misconfigure the webserver (Nginx in our case), you can accidentally allow acccess to the data directory to the public without authentication. As the Nginx Vhost in this Blogpost is definitely not configured incorrectly, we decided to skip this step.
Part 5: Nextcloud data directory: Hetzner Storage Box vs Cloud Volume vs Dedicated Server LVM
With Hetzner we have three options for storage: a Hetzner Storage Box (very cheap and the slowest option), Hetzner Cloud Volumes (fast, not cheap but not expensive either) or, in case you rented a dedicated server (new or from the server auctions), the local disks of this server using LVM (Logical Volume Manager).
As a recommendation: a cloud server with reasonable ressources and one additional 500 GB volume will cost you around 50.00 € per month. For this price you can get three times as much ressources and disk space from a dedicated server, plus the disks will be faster. The downside is that Hetzner Cloud instances and volumes are setup in a High Availability fashion, which single dedicated servers are obiously not. The Hetzner Cloud Volumes are CEPH storage (to the knowledge of the author).
Hence you have to choose between performance and reliability.
If you don't care about money and you are serious about uptime go with the Hetzner Cloud and its Cloud Volumes. If there is an issue with the underlying hardware, the Hetzner Cloud Hypervisor will fix it automatically. I (the author) have been hosting on the Hetzner Cloud since it was first created (before that on Hetzner virtual servers or vservers) and in my experience there is a Hetzner related issue with the instances that causes about an hour of downtime once every three years.
With a dedicated server you can get better speed, but if the hardware fails (which in the experience of the Author happens around once every three years, usually with a failing SSD or Hard Drive, which you can detect by monitoring the S.M.A.R.T. data of your hard drives with your monitoring system of choice using the Linux utility smartmontools) then rather go for a dedicated server. It will give you better performance for a lower price at the cost of a (slightly) higher chance of downtime.
Keep in mind that you only need disks that are fast enough to manage your concurrent number of users + how much they can up- or download using their respective internet connection.
If you are very serious about saving money then go for a Hetzner Storage Box in combination with a small cloud server or a dedicated server from the Hetzner server auctions, but don't expect the Storage Box to offer flying performance. Also keep in mind that servers from the auctions have been running for a while and will fail sooner than new hardware. Hetzner is fast (about two hours on average) at replacing faulty disks, SSDs and other hardware upon request via the Hetzner WebUI.
Using a Hetzner Storage Box
The cheapest option to get lots of GB or TB of storage is the Hetzner Storage Box.
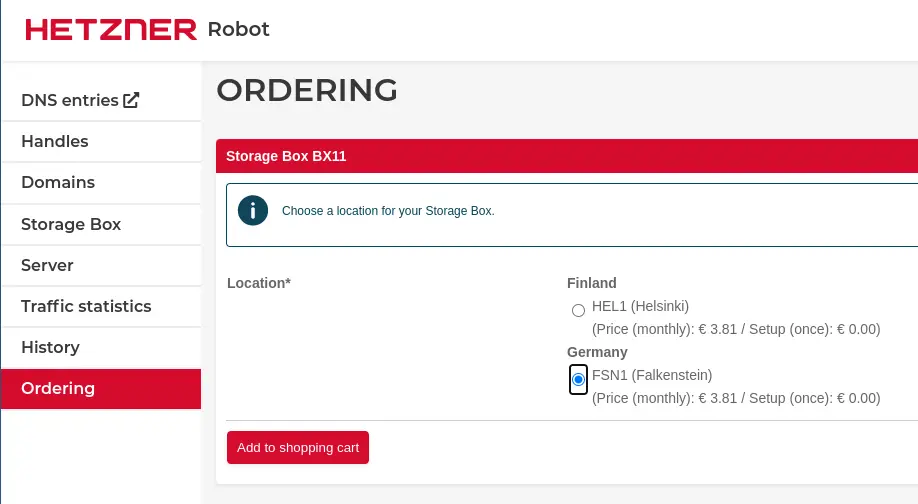
We will mount the storage box using SSHFS, the SSH network File System. Hetzner offers some documentation on how to setup the storage box correctly, which sadly is a bit incomplete and lacks the correct /etc/fstab options for using it with SSH public key authentication.
We will configure a systemd mount service to mount the Hetzner Storage Box using SSHFS. First install SSHFS using apt:
apt install sshfs
Generate a dedicated SSH keypair for the root user:
mkdir /root/.ssh
chmod 700 /root/.ssh
ssh-keygen -t ed25519 -a 100 -o -N '' -f /root/.ssh/id_ed25519_storage_box
Generating public/private ed25519 key pair.
Your identification has been saved in /root/.ssh/id_ed25519_storage_box
Your public key has been saved in /root/.ssh/id_ed25519_storage_box.pub
The key fingerprint is:
SHA256:dCDYkdo0HJFFKEk8LEgHVU6S9W7Vyxuz0IrGjJ8SF1w
The key's randomart image is:
+--[ED25519 256]--+
|.+oB=O=X+        |
|. o.@ X. E.      |
|   . B.oo...     |
|    . o+..o .    |
|       oS. *     |
|     .=.. o =    |
|     .o= . o     |
|     .o .        |
|      .o         |
+----[SHA256]-----+
Enable SSH support for your Storage Box and make sure to save the password (we will need it once).
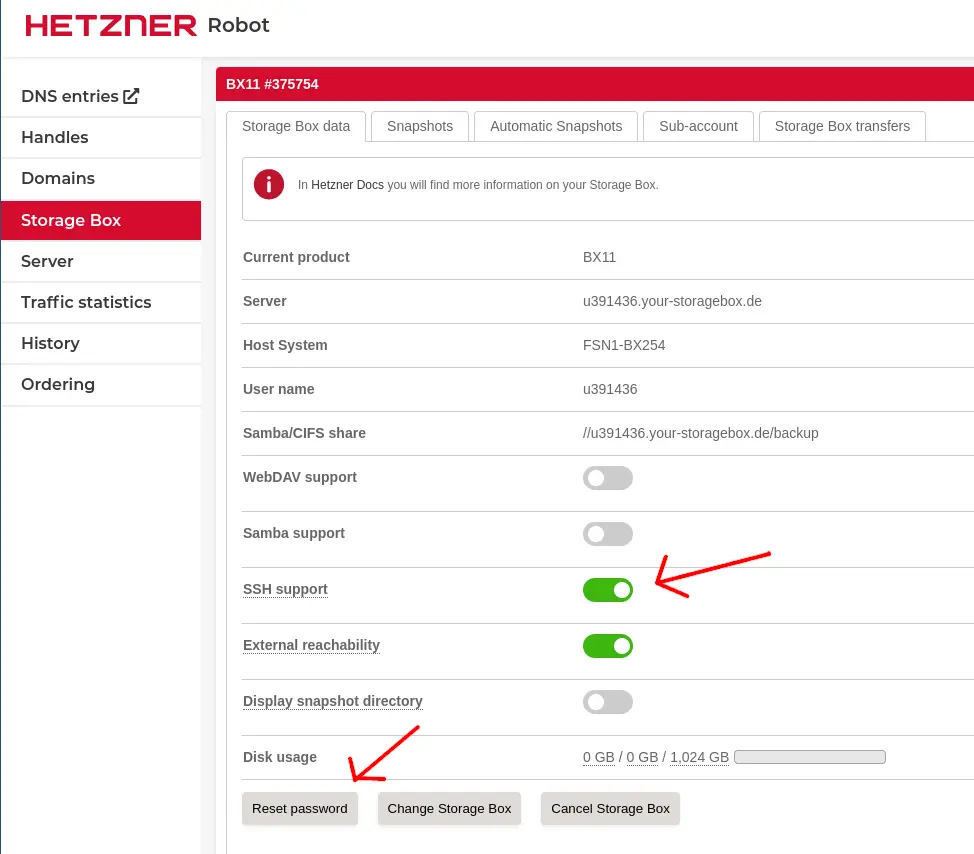
Install the SSH public key to use the storage box without a password. Note that we need to use port 23, not 22.
cat ~/.ssh/id_ed25519_storage_box.pub | ssh -p 23 u391436@u391436.your-storagebox.de install-ssh-key
u391436@u391436.your-storagebox.de's password:
Key No. 1 (ssh-ed25519 root@cloud) was installed in RFC4716 format
Key No. 1 (ssh-ed25519 root@cloud) was installed in OpenSSH format
Try mounting the storage box using sshfs. Note that we always mount the /home directory of the storage box. Hetzner configured the Storage Box so only this directory is writable.
sshfs -o IdentityFile=/root/.ssh/id_ed25519_storage_box -p 23 u391436@u391436.your-storagebox.de:/home /mnt
To view the available space of the mounted Storage Box:
df -ha /mnt
Filesystem                            Size  Used Avail Use% Mounted on
u391436@u391436.your-storagebox.de:/  1.0T  220K  1.0T   1% /mnt
Unmount the directory again so we can configure the systemd mount service for it:
umount /mnt
Now configure a systemd service for automatically mounting the Storage Box on boot:
cat << EOF > /etc/systemd/system/var-www-nextcloud-nextcloud-data.mount
[Unit]
Description=Hetzner Storage Box sshfs port 23 systemd mount
Requires=network-online.target
After=network-online.service

[Install]
WantedBy=multi-user.target

[Mount]
What=u391436@u391436.your-storagebox.de:/home
Where=/var/www/nextcloud/nextcloud/data
Type=sshfs
Options=_netdev,allow_other,x-systemd.automount,IdentityFile=/root/.ssh/id_ed25519_storage_box,reconnect,uid=900,gid=900,default_permissions,ssh_command=ssh -p 23
EOF
Apply the changes to the systemd configuration and start the systemd mount:
systemctl daemon-reload
systemctl enable var-www-nextcloud-nextcloud-data.mount
Created symlink /etc/systemd/system/multi-user.target.wants/var-www-nextcloud-nextcloud-data.mount → /etc/systemd/system/var-www-nextcloud-nextcloud-data.mount.

systemctl restart var-www-nextcloud-nextcloud-data.mount
systemctl status var-www-nextcloud-nextcloud-data.mount
● var-www-nextcloud-nextcloud-data.mount - Hetzner Storage Box sshfs port 23 systemd mount
     Loaded: loaded (/etc/systemd/system/var-www-nextcloud-nextcloud-data.mount; disabled; vendor preset: enabled)
     Active: active (mounted) since Tue 2024-02-20 20:16:39 UTC; 21ms ago
      Where: /var/www/nextcloud/nextcloud/data
       What: u391436@u391436.your-storagebox.de:/home
      Tasks: 5 (limit: 4524)
     Memory: 2.3M
        CPU: 55ms
     CGroup: /system.slice/var-www-nextcloud-nextcloud-data.mount
             ├─69974 ssh -p 23 -x -a -oClearAllForwardings=yes -oIdentityFile=/root/.ssh/id_ed25519_storage_box -2 u391436@u391436.your-storagebox.de -s sftp
             └─69976 /sbin/mount.sshfs u391436@u391436.your-storagebox.de:/home /var/www/nextcloud/nextcloud/data -o "rw,allow_other,IdentityFile=/root/.ssh/id_ed25519_storage_box,reconnect,uid=900,gid=900,default_permissions,ssh_command=ssh -p 23,>

Feb 20 20:16:39 blu-tool-prod-nc-1 systemd[1]: Mounting Hetzner Storage Box sshfs port 23 systemd mount...
Feb 20 20:16:39 blu-tool-prod-nc-1 systemd[1]: Mounted Hetzner Storage Box sshfs port 23 systemd mount.
Check if the directory was mounted correctly and is owned by the nextcloud user and group:
mount | grep nextcloud; ls -lha /var/www/nextcloud/nextcloud/data

u391436@u391436.your-storagebox.de:/home on /var/www/nextcloud/nextcloud/data type fuse.sshfs (rw,nosuid,nodev,relatime,user_id=900,group_id=900,default_permissions,allow_other,_netdev,x-systemd.automount)
total 12K

drwxr-xr-x 1 nextcloud nextcloud    3 Feb 17 01:02 .
drwxr-x--- 6 nextcloud nextcloud 4.0K Feb 20 20:15 ..
drwx------ 1 nextcloud nextcloud    3 Feb 17 01:03 .ssh
Notice that this gives the nextcloud user the ability to write to the ".ssh/authorized_keys" file for the storage box. Thats not brilliant, but if your Nextcloud application is compromised it can read all of the data in the box anyways.
We contacted Hetzner and asked if we could use "chattr +i ./ssh/authorized_keys" or anything else to make the file read only, but they declined saying that removing write permission for the file was not possible.
Using a HCloud Volume
If you run Nextcloud on a Hetzner Cloud instance, adding additional storage with Hetzner Cloud Volumes is a lot simpler to configure than with the storage box. Also the read and write speed is faster.

We will configure a systemd mount for the Hetzner Cloud volume with ext4 mount options tweaked for performance.
"commit=60" forces a full sync of all data and ext4 journal to be written to the physical disk or SSD every 60 seconds. If there is a loss of power the filesystem itself will not be damaged thanks to ext4 journaling.
"barrier=0" disables ext4 barriers, which ensure metadata is correctly written and ordered on disk, even when the write caches loses power. As we use a highly redundant Hetzner Cloud volume, we (most likely) don't need that.
"data=writeback" lets the filesystem delay writing data to disk, which can improve performance. It does this by not journaling the data and only the metadata. This increases the risk of data corruption in the event of a power failure or system crash. As the volume is provided by Hetzners highly available volume service, that should be ok.
These options increase disk read and write speed at the cost of relibility in regard to filesystem integrity in case of a critical operating system error or power cut. Make sure to have a reliable, space efficient and easy to use backup solution like borgbackup2 on Hetzner.
cat << EOF > /etc/systemd/system/var-www-nextcloud-nextcloud-data.mount
[Unit]
Description=Hetzner Cloud Volume systemd mount

[Install]
WantedBy=multi-user.target

[Mount]
What=/dev/sdb
Where=/var/www/nextcloud/nextcloud/data
Type=ext4
Options=noatime,nodiratime,data=writeback,commit=60,errors=remount-ro
EOF
To apply the changes to the systemd configuration and start the systemd mount:
systemctl daemon-reload
systemctl enable var-www-nextcloud-nextcloud-data.mount
Created symlink /etc/systemd/system/multi-user.target.wants/var-www-nextcloud-nextcloud-data.mount → /etc/systemd/system/var-www-nextcloud-nextcloud-data.mount.

systemctl restart var-www-nextcloud-nextcloud-data.mount
chown nextcloud:nextcloud /var/www/nextcloud/nextcloud/data
systemctl status var-www-nextcloud-nextcloud-data.mount
● var-www-nextcloud-nextcloud-data.mount - Hetzner Cloud Volume systemd mount
     Loaded: loaded (/etc/systemd/system/var-www-nextcloud-nextcloud-data.mount; disabled; vendor preset: enabled)
     Active: active (mounted) since Tue 2024-02-20 22:31:47 UTC; 16ms ago
      Where: /var/www/nextcloud/nextcloud/data
       What: /dev/sdb
      Tasks: 0 (limit: 4524)
     Memory: 16.0K
        CPU: 3ms
     CGroup: /system.slice/var-www-nextcloud-nextcloud-data.mount

Feb 20 22:31:47 blu-tool-prod-nc-1 systemd[1]: Mounting Hetzner Cloud Volume systemd mount...
Feb 20 22:31:47 blu-tool-prod-nc-1 systemd[1]: Mounted Hetzner Cloud Volume systemd mount.
If you selected "Choose mount options: Automatic" during the volumes creation, Hetzner will automatically create an "/etc/fstab" entry on the server and mount the volume. We can remove that entry and unmount the volume where Hetzner mounted it:
umount /mnt/HC_Volume_*
sed '/HC_Volume/d' /etc/fstab
Using LVM with a dedicated root server
The installimage tool has configured Linux LVM (Logical Volume Manager) as the partition manager. Use the following commands to view the size of the LVM PV (Physical Volume) and the present LVs (Logical Volumes). You can also see the available free space in "PFREE":
pvs
  PV         VG  Fmt  Attr PSize    PFree
  /dev/md1   vg0 lvm2 a--  <474.81g <370.81g

lvs
  LV        VG  Attr       LSize    Pool Origin Data%  Meta%  Move Log Cpy%Sync Convert
  root      vg0 -wi-ao----  100.00g
  swap      vg0 -wi-ao----    4.00g
Create a logical volume named nextcloud using all available remaining space:
lvcreate -l 100%FREE --name nextcloud /dev/vg0
  Logical volume "nextcloud" created.

lvs
  LV        VG  Attr       LSize    Pool Origin Data%  Meta%  Move Log Cpy%Sync Convert
  nextcloud vg0 -wi-a----- <370.81g
  root      vg0 -wi-ao----  100.00g
  swap      vg0 -wi-ao----    4.00g
Create a ext4 filesystem on the newly created Logical Volume:
mkfs.ext4 /dev/vg0/nextcloud
Define a systemd mount using mount options tweaked for performance. For a description of the performance relevant mount options, please refer to the very similar description for mounting HCloud volumes in this blog post.
cat << EOF > /etc/systemd/system/var-www-nextcloud-nextcloud-data.mount
[Unit]
Description=LVM Logical Volume systemd mount

[Install]
WantedBy=multi-user.target

[Mount]
What=/dev/vg0/nextcloud
Where=/var/www/nextcloud/nextcloud/data
Type=ext4
Options=noatime,nodiratime,data=writeback,commit=60,errors=remount-ro
EOF
Reload the systemd daemon for the changes to take effect and mount the directory:
systemctl daemon-reload
systemctl enable var-www-nextcloud-nextcloud-data.mount
Created symlink /etc/systemd/system/multi-user.target.wants/var-www-nextcloud-nextcloud-data.mount → /etc/systemd/system/var-www-nextcloud-nextcloud-data.mount.

systemctl start var-www-nextcloud-nextcloud-data.mount
chown nextcloud:nextcloud /var/www/nextcloud/nextcloud/data
systemctl status var-www-nextcloud-nextcloud-data.mount

● var-www-nextcloud-nextcloud-data.mount - LVM Logical Volume systemd mount
     Loaded: loaded (/etc/systemd/system/var-www-nextcloud-nextcloud-data.mount; enabled-runtime; preset: enabled)
     Active: active (mounted) since Wed 2024-02-21 02:18:57 CET; 1h 55min ago
      Where: /var/www/nextcloud/nextcloud/data
       What: /dev/mapper/vg0-nextcloud
Part 6: First admin login using a browser
On first opening the page https://cloud.your-company.com you need to enter the MySQL username and password that we created while installing Mariadb:
This fist login will create the "/var/www/nextcloud/nextcloud/config/config.php" file, where we need to add some settings for additional performance and security. Open the Nextcloud config file in an editor and append the following lines at the bottom, but before the final "]". There is no need to restart PHP-FPM after this.
editor /var/www/nextcloud/nextcloud/config/config.php
  'debug' => false,
  'enable_previews' => false,
  'maintenance_window_start' => 1,
  'memcache.local' => '\OC\Memcache\APCu',
  'memcache.distributed' => '\OC\Memcache\Redis',
  'memcache.locking' => '\OC\Memcache\Redis',
  'redis' => [
     'host' => 'localhost',
     'port' => 6379,
  ],
You also need to setup a cronjob or systemd timer to run nextcloud's cron.php file every 5 minutes:
cat << EOF > /etc/systemd/system/nextcloud-cronjob.service
[Unit]
Description=Nextcloud systemd cron.php timer

[Service]
User=nextcloud
ExecCondition=/usr/bin/php8.2 --define apc.enable_cli=1 -f /var/www/nextcloud/nextcloud/occ status -e
ExecStart=/usr/bin/php8.2 --define apc.enable_cli=1 -f /var/www/nextcloud/nextcloud/cron.php
KillMode=process
EOF
Sidenote: The usage of "--define apc.enable_cli=1" fixes the Error: "OCP\HintException: [0]: Memcache OC\Memcache\APCu not available for local cache (Is the matching PHP module installed and enabled?)"
Then create a systemd timer:
cat << EOF > /etc/systemd/system/nextcloud-cronjob.timer
[Unit]
Description=Run Nextcloud cron.php every 5 minutes

[Timer]
OnBootSec=5min
OnUnitActiveSec=5min
Unit=nextcloud-cronjob.service

[Install]
WantedBy=timers.target
EOF
Then start the systemd timer:
systemctl daemon-reload

systemctl restart nextcloud-cronjob.service
systemctl status nextcloud-cronjob.service
● nextcloud-cronjob.service - Nextcloud systemd cron.php timer
     Loaded: loaded (/etc/systemd/system/nextcloud-cronjob.service; static)
     Active: active (running) since Sun 2024-02-25 13:27:01 UTC; 14s ago
TriggeredBy: ● nextcloud-cronjob.timer
    Process: 6201 ExecCondition=/usr/bin/php8.2 --define apc.enable_cli=1 -f /var/www/nextcloud/nextcloud/occ status -e (code=exited, status=0/SUCCESS)
   Main PID: 6208 (php8.2)
      Tasks: 1 (limit: 38105)
     Memory: 38.8M
        CPU: 462ms
     CGroup: /system.slice/nextcloud-cronjob.service
             └─6208 /usr/bin/php8.2 --define apc.enable_cli=1 -f /var/www/nextcloud/nextcloud/cron.php

Feb 25 13:27:01 cloud systemd[1]: Starting Nextcloud systemd cron.php timer...
Feb 25 13:27:01 cloud systemd[1]: Started Nextcloud systemd cron.php timer.

systemctl enable --now nextcloud-cronjob.timer
Created symlink /etc/systemd/system/timers.target.wants/nextcloud-cronjob.timer → /etc/systemd/system/nextcloud-cronjob.timer.

systemctl status nextcloud-cronjob.timer
● nextcloud-cronjob.timer - Run Nextcloud cron.php every 5 minutes
     Loaded: loaded (/etc/systemd/system/nextcloud-cronjob.timer; enabled; vendor preset: enabled)
     Active: active (running) since Sun 2024-02-25 13:27:01 UTC; 40s ago
    Trigger: n/a
   Triggers: ● nextcloud-cronjob.service

Feb 25 13:27:01 cloud systemd[1]: Started Run Nextcloud cron.php every 5 minutes.
Now that Nextcloud was started and accessed once it has created its logfile "/var/www/nextcloud/nextcloud/data/nextcloud.log". This file can get quite large and hence resides in the mounted directory. We can now start fail2ban:
systemctl restart fail2ban.service
systemctl status fail2ban.service
● fail2ban.service - Fail2Ban Service
     Loaded: loaded (/lib/systemd/system/fail2ban.service; enabled; vendor preset: enabled)
     Active: active (running) since Thu 2024-02-22 06:02:53 UTC; 3s ago
       Docs: man:fail2ban(1)
   Main PID: 23263 (fail2ban-server)
      Tasks: 3 (limit: 38105)
     Memory: 11.8M
        CPU: 117ms
     CGroup: /system.slice/fail2ban.service
             └─23263 /usr/bin/python3 /usr/bin/fail2ban-server -xf start

Feb 22 06:02:53 cloud systemd[1]: Started Fail2Ban Service.
Feb 22 06:02:53 cloud fail2ban-server[23263]: Server ready
To view the active fail2ban jails use the fail2ban-client command:
fail2ban-client status
Status
|- Number of jail:	4
`- Jail list:	nextcloud, nginx-botsearch, nginx-http-auth, sshd
You now have a working Nextcloud installation. Congrats!
You should now look at https://cloud.blunix.com/settings/admin/overview to check if the admin WebUI displays any error messages. After that, you should run a Nextcloud security scan against your server.
Sidenote: https://cloud.blunix.com/settings/admin/logging tells us "Could not load log entries", and then shows the logs after about five to ten seconds. This github issue states that this is related to my reasonably paranoid browser Librewolf and the adblocker it comes with.
Part 7: Maintenance updates, upgrades and debugging
Nextcloud itself is pretty low maintenance. There are one or two things you should know though:
Upgrading the PHP version with apt
To upgrade the PHP version used by PHP-FPM - as an example we will upgrade from php8.2 to php8.3:
Install the required apt packages:
apt install \
    php8.3-apcu \
    php8.3-bcmath \
    php8.3-bz2 \
    php8.3-cli \
    php8.3-common \
    php8.3-curl \
    php8.3-dev \
    php8.3-fpm \
    php8.3-gd \
    php8.3-gmp \
    php8.3-imagick \
    php8.3-intl \
    php8.3-mbstring \
    php8.3-mysql \
    php8.3-redis \
    php8.3-soap \
    php8.3-xml \
    php8.3-zip \
Remove the default php-fpm pool of the new version:
rm /etc/php/8.3/fpm/pool.d/www.conf
Move the php-fpm pool configuration from 8.2 to 8.3:
cp /etc/php/8.2/fpm/pool.d/nextcloud.conf /etc/php/8.3/fpm/pool.d/nextcloud.conf
Stop and disable php8.2-fpm and enable and start php8.3-fpm:
systemctl stop php8.2-fpm.service
systemctl disable php8.2-fpm.service
rm /etc/php/8.2/fpm/pool.d/nextcloud.conf
systemctl enable php8.3-fpm.service
systemctl start php8.3-fpm.service
If you like a clean system you can uninstall php8.2, but CAREFULLY read the output to make sure apt does not remove dependencies you require:
apt remove --purge php8.2*
Upgrading the Nextcloud version
Disable the systemd service for the nextcloud cronjob:
systemctl stop nextcloud-cronjob.service
Login as the nextcloud user and run the following commands:
php8.2 nextcloud/occ upgrade
After a successful upgrade do not forget to start the cronjob again:
systemctl start nextcloud-cronjob.service
Monitoring recommendations
Regularly scan your nextcloud server using the Nextcloud security scanner:
Resetting nextcloud admin or user password on the command line
To reset any users password, login as the nextcloud user and run the following commands:
php8.2 nextcloud/occ user:resetpassword blunix
Enter a new password:
Confirm the new password:
Successfully reset password for blunix
Replacing a faulty HDD or SSD in a Hetzner dedicated server
To replace a faulty disk, first select the support tab for your server:
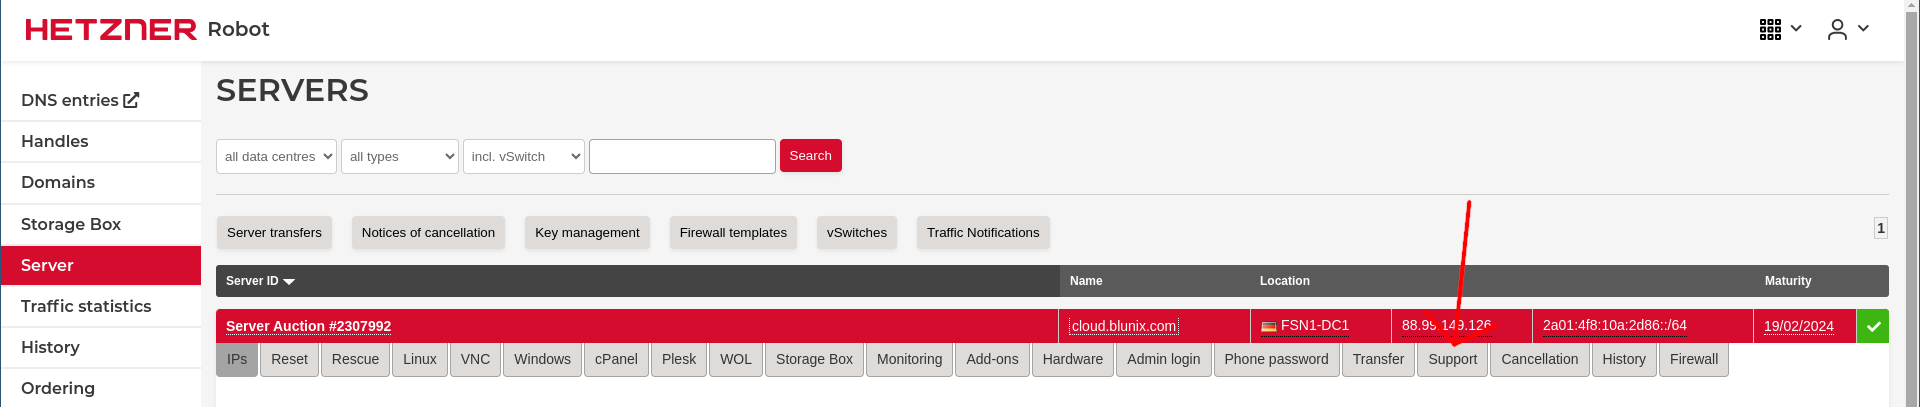
Then select "Technical":
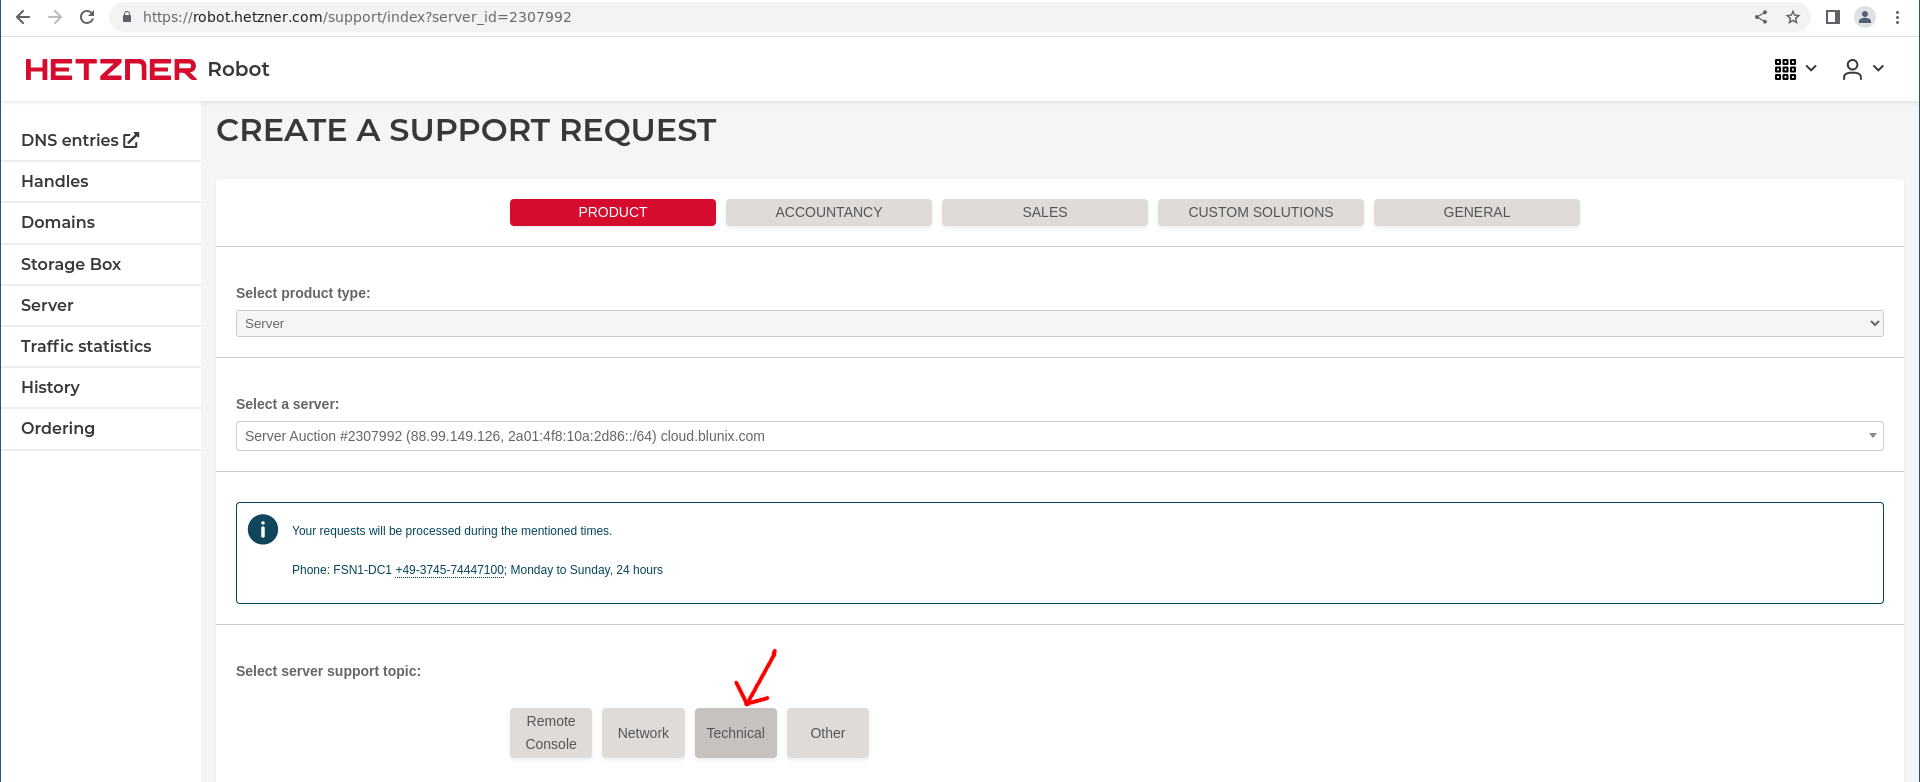
You then need the serial number of the WORKING disk drive or SSD. We assume that the broken one is unresponsive. Issue the following command to determine the serial number of the working disk:
hdparm -I /dev/sda | grep 'Serial Number'
	Serial Number:      17071C5E4191
Unsolvable problems
Just contact your friendly professional Blunix Consultant. We are happy to fix your Nextcloud for you.