What is a Linux Server Mailrelay?
A SMTP Relay, or Mail Relay, which is set up on most Linux (Web) servers takes emails from your (Web) application, puts them into a queue and relays them to large mail provider like Google Workspace or Gmail, Microsoft Outlook or Office 365, ZOHO Mail, Amazon Workmail (AWS) or others, which then deliver the email to the actual recipient: your customer requesting a password reset or waiting for a booking confirmation.
When emails are recieved by the mailrelay program they are put into a queue. The mailrelay will then open an authenticated SMTP connection to the large mail provider. This works the same way as what your workstations email program: it logs in to your email provider using an SMTP username and password and tells it "relay this email to customer@example.com".
If there is a problem, like your mail provider rate limiting your account over sending out 50.000 newsletters at once, the email stays in the queue and relaying is attempted again and again. The time until the next attempt increases with each attempt, starting from a few seconds up to several minutes.
The advantages are that emails stay in the queue if there is a problem. The number of emails in the queue is commonly zero and a mail queue that is full for more than a few minutes would trigger an alert in your favorite monitoring system to notify you or the Blunix Hosting Team. You do not need to configure your application to deal with the many issues that can arise during relaying emails (in large quantities), because OpenSMTPD is designed to handle this.
Bad approach: relaying emails directly within your application
A commonly chosen but bad practice approach to handle emails generated by webapplications is to setup the SMTP credentials of your email provider directly in your webapps config file. If your webapp generates a booking confirmation or a password reset email and your email provider is temporarily unavailable or there is a networking or any other issue, the email will get dropped with an error message in your application log, which you might not notice.
Another bad approach: sending emails directly from your webservers using SPF records
It used to be common practice to setup SPF records for your webservers public IP addresses and send emails directly from your webservers. This practice is HIGHLY discouraged today as you are delivering to thousands of different mail providers, most of which will be unhappy if you do not send mail from a large company mail system. Sending mails from your webservers directly without relaying over a large provider like google or similar will fail rather often and is not really worth the hassle in our opinion.
To name one practical example, office365 maintains a whitelist of mail server IPs it accepts emails from and if you want to deliver to office365 you need to use their contact form to get your webservers IPs on this whitelist. Together with all the other problems you will face in production environments when sending thousands to tens of thousands of emails per day, this is a waste of time and you should outsource this to large email providers.
Possibly bad approach: relaying mails directly to your provider via an API
Some email providers like Mailchimp offer sending emails by API calls, which means there is no SMTP involved on your applications end at all. That is very good, unless the API is down. In this case you need to configure your application to queue the mail itself until the API is back up.
Mailrelays make your job very easy - you give it the mails you want to send and leave it to your friendly Linux Administrator to react to monitoring alerts if the emails queue up because there is a problem.
Why OpenSMTPD instead of Postfix?
I (the author) have administrated postfix systems for around 15 years and its just horribly annoying to do. Postfix got its name Post-Fix (repaired later) for a reason. There are whole books about how to configure it, which for a simple mailrelay is absolute overkill.
In Postfix, the split between main.cf and master.cf is utterly confusing, especially to new users or our customers. It is not helpful to build software that is utterly hard to understand. Large scale email providers may require a very feature rich and somewhat complex mail program, for which postfix may be more suited in specific edge cases, but for a mailrelay it is not. To quote the ZEN of Python: simple is better than complex.
For a mailrelay on a webserver that does nothing but take an email from a webapplication and relay it to a mail provider like google, the complexity of postfix will only bring problems when you try to debug something. Hence, opensmtpd is the perfect choice for a mailrelay.
Installing and configuring OpenSMTPD
Installing OpenSMTPD for a Mailrelay on Debian and Ubuntu requires only one apt package. Also install the package mailutils which provides the command line tool "mail" that we will need for debugging and sending test-mails later.
apt install opensmtpd mailutils
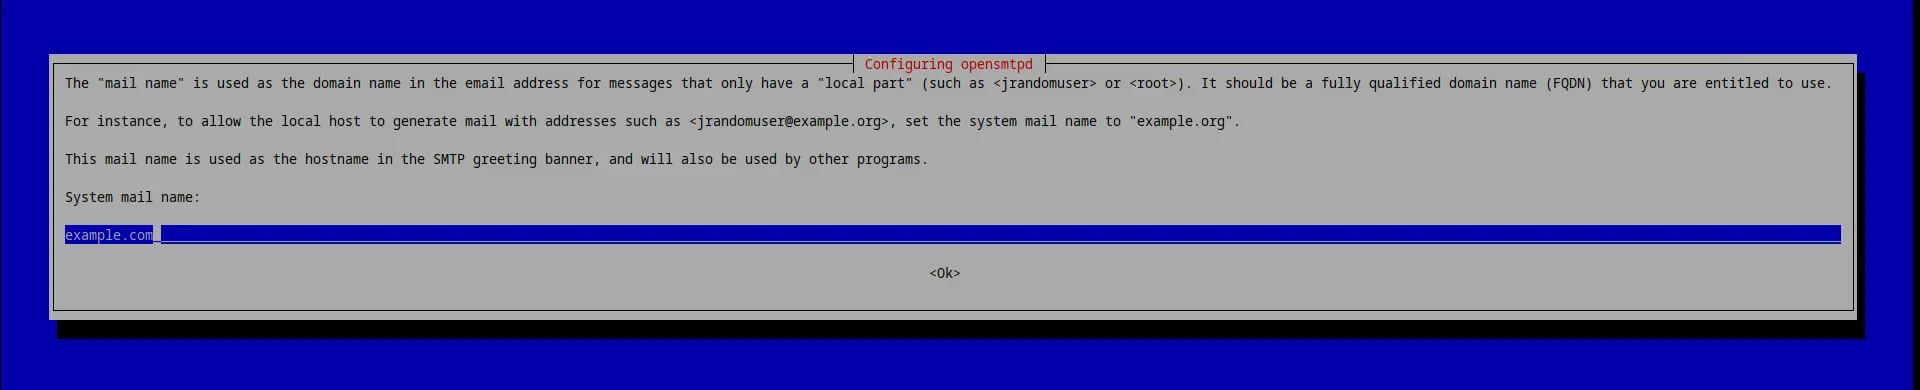
While installing the opensmtpd package apt will ask you for the "mail name" for this particular server. If your webapp is reachable at example.com, you should enter example.com here. If you have 20 webservers behind a load balancer, each with its own local mailrelay (thats the correct approach), then on all of those webservers you should enter example.com as the mail name.
DO NOT!!! put the actual servers hostname here! If (and if not) you follow the Blunix naming scheme for servers, do NOT put something like "exa-www-prod-web-1" or "web-5.example.com" here. The mail name will later be written into the headers of all emails you relay. There is no reason to tell the endusers (or a potential attacker) about how you name your servers.
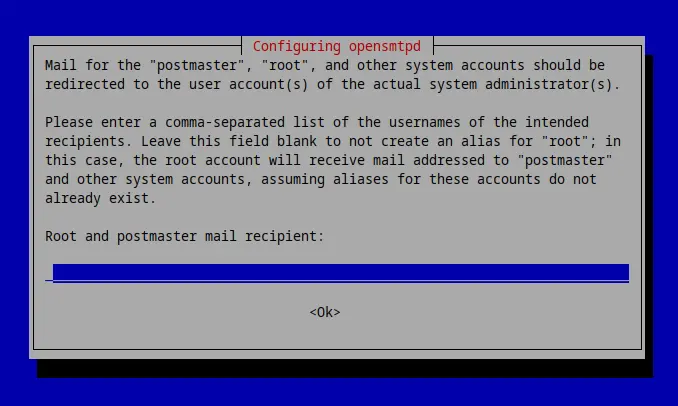
The next question is intended for using OpenSMTPD as an actual mailservers and not a relay. You can leave it blank for now as we will manually configure aliases in more detail later.
Preparations
By default opensmtpd only creates an exemplary "/etc/smtpd.conf". We will save the SMTP authentication credentials for your mail accounts in a OpenSMTPD table placed below "/etc/smtpd/tables/".
mkdir -p /etc/smtpd/tables
Creating the relay_secrets SMTP authentication credentials file
Next setup the SMTP auth credentials - your email accounts usernames and passwords. You will get those from your email provider (gmail and alike). This is the same as what you would setup in your thunderbird, Microsoft Outlook or other local email client for workstations.
OpenSMTPD requires an alias for each user:password combination. We will later use this alias to associate how to route emails.
cat << EOF > /etc/smtpd/tables/relay_secrets
# alias smtp-username:smtp-password

# SMTP account for booking confirmation emails
webapp_booking booking@example.com:very-secure-password

# SMTP account for password reset emails
webapp_pw_reset password-reset@example.com:super-secure-password

# SMTP account for all other emails
monitoring monitoring@example.com:extremely-secret-password
EOF

chmod -R 750 /etc/smtpd/
chmod 640 /etc/smtpd/tables/relay_secrets
chown -R root:opensmtpd /etc/smtpd/
Understanding /etc/smtpd.conf
The following code snippets explain the contents of an examplary /etc/smtpd.conf file. You do not need to copy paste these lines - there is a complete copy pastable example below. The following lines are just for your understanding of OpenSMTPDs configuration file.
The table relay_secrets directive
table relay_secrets file:/etc/smtpd/tables/relay_secrets
OpenSMTPD uses tables, which are like small databases in text files. The table described here refers to the file we created above that contains the SMTP authentication credentials for the email addresses that we want to use to relay emails.
The listen directive
listen on lo \
    port 25 \
    hostname example.com \
    mask-src
The listen directive declares on which IP and port OpenSMTPD is supposed to listen.
"lo" refers to the loopback interface, which is only available for communication with the local host:
ip address show lo
1: lo:  mtu 65536 qdisc noqueue state UNKNOWN group default qlen 1000
    link/loopback 00:00:00:00:00:00 brd 00:00:00:00:00:00
    inet 127.0.0.1/8 scope host lo
       valid_lft forever preferred_lft forever
    inet6 ::1/128 scope host noprefixroute
       valid_lft forever preferred_lft forever
Configuring the listen directive like this will cause OpenSMTPD to listen on 127.0.0.1:25 only (port 25 is the default SMTP port), as we do not want to accept incoming emails from the outside world but only relay emails from local applications. Your (web) application will give its emails to OpenSMTPD on this ip:port.
The listen-hostname directive declares the hostname OpenSMTPD will return when starting the SMTP dialogue.
This can be shown by opening a telnet session to localhost:25
telnet localhost 25
Trying ::1...
Connected to localhost.
Escape character is '^]'.
220 example.com ESMTP OpenSMTPD     <== HERE
OpenSMTPD will also write this into the header of all emails it processes. Here is an example snippet from an email header that we send using this type of mailrelay:
Received: from [127.0.0.1] (localhost [::1])
        by example.com (OpenSMTPD) with ESMTP id e9ad62c1     <== HERE
        for <info@blunix.com>;
        Thu, 7 Mar 2024 05:43:15 +0000 (UTC)
Note that you can disable OpenSMTPD writing this IP address into the Received header by using mask-src directive described in the next sentence:
The listen-mask-src directive configures OpenSMTPD to omit the "from" part when prepending "Received" headers. The purpose of using mask-src is to enhance privacy and security by not disclosing the source IP address the client (your web application) that is sending email through the OpenSMTPD server. It is not good practice reveal the internal network structure.
Here is an example with mask-src:
Received:                                      <== NOTHING HERE
        by example.com (OpenSMTPD) with ESMTP
        for ;
        Fri, 8 Mar 2024 13:11:11 +0000 (UTC)
And without mask-src:
Received: from localhost (localhost [::1])     <== CLIENT HOST INFORMATION HERE
        by example.com (OpenSMTPD) with ESMTP id a87e4b85
        for ;
        Fri, 8 Mar 2024 13:14:29 +0000 (UTC)
Additionally to listening on 127.0.0.1:25 we can configure OpenSMTPD to listen on a UNIX socket "/var/run/smtpd.sock" and accept SMTP connections there:
listen on socket \
    mask-src
You can use multiple listen directives for all IPs and sockets you wish to configure, but for a mailrelay you will most likely only want to listen on 127.0.0.1 and / or a UNIX socket.
If you want other servers to be able to relay emails using a specific SMTP relay server, you can configure OpenSMTPD to listen on a publicly reachable network interface, commonly named something like eth0:
listen on eth0 \
    port 25 \
    hostname example.com \
    mask-src
The interface eth0 has a public IP address:
ip address show eth0
2: eth0:  mtu 1500 qdisc fq_codel state UP group default qlen 1000
    link/ether 96:00:03:13:99:ab brd ff:ff:ff:ff:ff:ff
    altname enp1s0
    inet 5.75.164.46/32 brd 5.75.164.46 scope global dynamic eth0     <== HERE
       valid_lft 71144sec preferred_lft 71144sec
    inet6 fe80::9400:3ff:fe13:99ab/64 scope link
       valid_lft forever preferred_lft forever
The action directive
action "relay_monitoring" \
    relay \
    tls \
    host smtp://monitoring@smtp.gmail.com:587 \
    auth <relay_secrets>
The action directive uses the MAIL FROM address to determine which emails to relay to which relay server (like gmail, office365, zoho, ...) and how. For example, it defines that all emails send FROM booking@example.com are relayed over smtp.gmail.com port 587 with TLS required using the SMTP authentication credentials defined in the table "relay_secrets".
The action-relay directive defines that this action is supposed to relay emails to another server (like gmail).
The action-tls directive defines that all connections require a VALID(!) TLS certificate. It is sadly very common for mailserver providers to provide an invalid TLS certificate that is either self signed, expired or only valid for another domain. This directive will not accept that, much like your browser would not open a connection to a website with a faulty TLS certificate.
If you are using a smaller email provider to relay your emails and you are getting TLS errors in your logfile while debugging your new mailrelay setup, you might be forced to remove this directive (or contact your mail provider to fix his certificate - which in our experience sadly never happens).
The action-host directive defines to which mailserver emails are to be relayed. This one is a bit tricky:
Note the
This means that in this example for the action directive, "monitoring@example.com" is NOT an email address! "monitoring" is the alias we defined in "/etc/smtpd/tables/relay_secrets" and "example.com" is the mailserver we want to relay emails with. The syntax for the action-host directive is: "protocol://relay_secrets_table_alias@mailserver:port" The action-auth directive simply tells OpenSMTPD to lookup authentication credentials in the "auth_secrets" table described above. The match directive pairs the action defined above to specific "MAIL FROM" addresses - if you send a mail from monitoring@example.com then we need the following match directive to tell OpenSMTPD to associate it with the action we defined for it above. For whatever reason the OpenSMTPD manual page section on action directive options linked above have anchor links, while the match directives have not. Please refer to the match directive manual section and scroll down. The match from-local directive specifies that the connection can only originate from localhost. As our listen directive above already specifies 127.0.0.1:25 thats somewhat redundant - it is also the default for all match directives, but explicit is better than implicit (second line of the Zen of Python and generally a good idea as well).
The match mail-from directive specifies which MAIL FROM address to match when processing emails. You HAVE to define the MAIL FROM address in your application when you generate mails. You can find examples on how to do this
on the command line / BASH,
in PHP,
in Python3 and
in Golang below. The match for-any directive specifies that the connection may be addressed to any recipient. This just means match all possible recipient email addresses (SMTP: RCTP TO). The match action directive pairs this match directive to the "relay_monitoring" action we described above. You can specify muliple match directives. Blunix prefers to have one per Linux user, just in case any of them generate emails. This is commonly the case with cronjobs that generate any output to stdout or stderr. Debian manages output generated by cronjobs owned by the root user by sending it in an email to the "root" user. Hence forcing all mails from given users to be relayed over the monitoring address is helpful to not loose this output in case cronjobs have any problems. Or you can send all email with undefined sender addresses via one specific SMTP account:
At Blunix we prefer not to use emails for error messages from cronjobs and alike at all - we relay all of these messages to Matrix chatrooms using this python3 script, which we use with an action like so: "action relay_monitoring relay host smtp://127.0.0.1:12325". This is documented in the Blunix Manual, but would be out of scope for this blogpost. If you want to relay monitoring emails to matrix or any other chat using OpenSMTPD, please contact your friendly Blunix Linux consultant for assistance.
As the final match directive you can define a catchall that simply rejects all mail from undefined email addresses. If an email is send using an unknown MAIL FROM address, it is rejected: The log message result="550 Invalid recipient: <info@blunix.com>" that this action will generate is a bit weird - the recipient (info@blunix.com) is of course correct, the sender (unknown@example.com) is not: Note that this does not prevent "unauthorized" Linux users from sending or relaying emails. Every Linux user on the server running this OpenSMTPD mailrelay with access to 127.0.0.1:25 or access to /var/run/smtpd.sock can send emails by simply specifying the MAIL FROM header to an address for which we have defined a match directive. Here is a copy pastable example for the /etc/smtpd.conf as described and explained above. Make sure to adjust it to your requirements. The following commands will set secure permissions for the config file: Finally (re)start the OpenSMTPD systemd service and enable it to start on boot: Time to test if everything is working. Open a second terminal to live-follow the logfiles as they appear: Now lets send a test mail. Feel free to send spam to info@blunix.com ;) To send a test mail with PHP, we will need to install PHP: The following simple PHP script will generate a testmail. Notice that we specify the sender address, which is important for OpenSMTPD to "match" the STMP account to use for relaying! The following simple Python3 script will generate a testmail. Notice that we specify the sender address, which is important for OpenSMTPD to "match" the STMP account to use for relaying! The following simple Golang program will generate a testmail. Notice that we specify the sender address, which is important for OpenSMTPD to "match" the STMP account to use for relaying! To quickly install golang on Debian or Ubuntu use the following commands. Refer to the golang website for the latest version. Here is a simple go program to send a test email. Remember to always specify the sender address: Lets build the program and run it: The Blunix Manual section on the OpenSMTPD mailrelay lists common commands to interact with mails in the mailqueue.
The match directive
match \
    from local \
    mail-from "monitoring@example.com" \
    for any \
    action "relay_monitoring"
# MAIL FROM is a linux user account name
match from local mail-from "root" for any action "relay_monitoring"
match from local mail-from "www-data" for any action "relay_monitoring"
match from local mail-from "prometheus-alertmanager" for any action "relay_monitoring"
match from any reject
match from any for any action "relay_monitoring"
echo "email-body" | mail --subject="mail-subject" --append="From: unknown@example.com" info@blunix.com
mail: cannot send message: Process exited with a non-zero status
journalctl -f _COMM=smtpd
Mär 08 20:48:47 webserver smtpd[88171]: 2cd79d8bacbe2c12 smtp connected address=local host=webserver
Mär 08 20:48:47 webserver smtpd[88171]: 2cd79d8bacbe2c12 smtp failed-command command="RCPT TO:<info@blunix.com> " result="550 Invalid recipient: <info@blunix.com>"
Mär 08 20:48:47 webserver smtpd[88171]: 2cd79d8bacbe2c12 smtp disconnected reason=disconnect
/etc/smtpd.conf as copy pastable example
cat << "EOF" > /etc/smtpd.conf
table relay_secrets file:/etc/smtpd/tables/relay_secrets
listen on lo port 25 mask-src hostname example.com
listen on socket mask-src
action "relay_monitoring" relay tls host smtp://monitoring@smtp.gmail.com:587 auth
chmod 640 /etc/smtpd.conf
chown root:opensmtpd /etc/smtpd.conf
systemctl restart opensmtpd.service

systemctl enable opensmtpd.service
Synchronizing state of opensmtpd.service with SysV service script with /lib/systemd/systemd-sysv-install.
Executing: /lib/systemd/systemd-sysv-install enable opensmtpd

systemctl status opensmtpd.service
● opensmtpd.service - OpenSMTPD SMTP server
     Loaded: loaded (/lib/systemd/system/opensmtpd.service; enabled; preset: enabled)
     Active: active (running) since Fri 2024-03-08 21:13:29 UTC; 26min ago
       Docs: man:smtpd(8)
    Process: 89525 ExecStart=/usr/sbin/smtpd (code=exited, status=0/SUCCESS)
   Main PID: 89527 (smtpd)
      Tasks: 7 (limit: 2251)
     Memory: 12.9M
        CPU: 187ms
     CGroup: /system.slice/opensmtpd.service
             ├─89527 /usr/sbin/smtpd
             ├─89528 "smtpd: klondike"
             ├─89529 "smtpd: control"
             ├─89530 "smtpd: lookup"
             ├─89531 "smtpd: pony express"
             ├─89532 "smtpd: queue"
             └─89533 "smtpd: scheduler"
Testing the new mailrelay installation
Live viewing the mail logs using journalctl
journalctl -f _COMM=smtpd
Sending a test mail using BASH
echo "$(whoami)@$(hostname)" | mail --subject=testsubject --append="From: monitoring@example.com" info@blunix.com
Sending a test mail using PHP
apt install php
<?php
$to = 'info@blunix.com';
$subject = 'Test Email';
$message = 'Hello, this is a test email sent from a PHP script.';
$headers = 'From: monitoring@example.com' . "\r\n" .
    'X-Mailer: PHP/' . phpversion();

if(mail($to, $subject, $message, $headers)) {
    echo "Email sent successfully";
} else {
    echo "ERROR sending email!";
}
?>
Sending a test mail using Python3
#!/usr/bin/env python3

import smtplib
from email.mime.text import MIMEText
from email.header import Header
from email.utils import formataddr

mail_from = 'monitoring@example.com'
rcpt_to = 'info@blunix.com'
subject = 'Test Email'
message = 'Hello, this is a test email sent from a Python3 script.'
smtp_server = 'localhost'
smtp_port = 25

msg = MIMEText(message, 'plain', 'utf-8')
msg['Subject'] = Header(subject, 'utf-8')
msg['From'] = formataddr(('Bot', mail_from))
msg['To'] = rcpt_to

try:
    with smtplib.SMTP(smtp_server, smtp_port) as server:
        server.sendmail(mail_from, [rcpt_to], msg.as_string())
        print("Mail sent successfully!")
except Exception as e:
    print("Mail not sent!")
    print(e)
Sending a test mail using Golang
golang_version="1.22.1"
wget https://go.dev/dl/go${golang_version}.linux-amd64.tar.gz
rm -rf /usr/local/go && tar -C /usr/local -xzf go${golang_version}.linux-amd64.tar.gz
export PATH=$PATH:/usr/local/go/bin
grep "go/bin" ~/.bashrc || echo 'export PATH=$PATH:/usr/local/go/bin' >> ~/.bashrc
go version
go version go1.22.1 linux/amd64
package main

import (
        "log"
        "net/smtp"
)

func main() {
        from := "monitoring@example.com"
        to := []string{
                "info@blunix.com",
        }
        smtpHost := "localhost"
        smtpPort := "25"

        message := []byte("From: monitoring@example.com\r\n" +
                "To: info@blunix.com\r\n" +
                "Subject: Test Email\r\n" +
                "\r\n" +
                "Hello, this is a test email sent from a Go script.\r\n")

        err := smtp.SendMail(smtpHost+":"+smtpPort, nil, from, to, message)
        if err != nil {
                log.Fatalf("Failed to send email: %v", err)
        }

        log.Println("Mail sent successfully")
}
go build my-golang-testmail-program.go
./my-golang-testmail-program
2024/03/07 05:54:55 Mail sent successfully
Common administration commands and debugging
Automated installation of OpenSMTPD with Ansible
Blunix uses Ansible for managing its SLA hosting customers. We provide an Open Source Ansible role for a OpenSMTPD mailrleay. The git repository of this role is mirrored to github.